Uplink How-To Guide
Everything from installation to tweaks, step by step.

What is Uplink?
Uplink is a fast, secure IRC chat client built with Qt6 and C++20. It connects over TLS (encrypted) by default, supports IRCv3 features like chat history, typing indicators, and SASL authentication, and ships with 297 built-in color themes. The default server is irc.libera.chat:6697, channel #uplinkirc.
It runs on Linux, macOS, Windows, and FreeBSD.
#), and chat with other people. Uplink handles all the protocol details; you just type.
Download (pre-built binaries)
The easiest way to get started is to download a pre-built release. No compiler needed.
| Platform | Download | How to run |
|---|---|---|
| Linux x86_64 (AppImage) | Latest release ↗ | chmod +x Uplink-*.AppImage && ./Uplink-*.AppImage |
| Arch Linux (AUR) | aur.archlinux.org ↗ | yay -S uplink-irc (also -bin prebuilt, -git dev) |
| Linux x86_64 (tar.gz) | Latest release ↗ | Extract the .tar.gz, run ./Uplink |
| Windows x64 | Latest release ↗ | Extract the .zip, double-click Uplink.exe |
| macOS arm64 | Latest release ↗ | See install steps below |
| FreeBSD | Build from source (see below) | ./Uplink |
Because Uplink is not signed with an Apple Developer certificate, Gatekeeper will warn you on first launch. Follow these steps exactly:
- Download the
.dmgfrom the releases page. - Double-click the DMG. When macOS says it cannot verify the file, click Done (not Eject; the volume stays mounted).
- Double-click the DMG icon on your desktop to open it and see Uplink.app inside.
- Open a new Finder window (Cmd+N) and click Applications in the sidebar.
- Drag Uplink.app from the DMG window into Applications.
- Eject the DMG (right-click the desktop icon → Eject).
- In Applications, right-click Uplink.app → Open. Click Done on the warning dialog.
- Open System Settings → Privacy & Security, scroll down, and click Open Anyway next to the Uplink entry.
- Click Open in the confirmation. Uplink launches and macOS remembers your approval.
After the first launch, Uplink opens normally with no warnings.
Connecting to a server on your LAN: macOS also requires the Local Network permission before any app can reach local addresses (192.168.x.x). If a home bouncer or LAN server fails with "Host unreachable" while internet networks connect fine, enable Uplink under System Settings → Privacy & Security → Local Network, then reconnect.
Updating: click Help → Check for Updates. If a new version is available, Uplink downloads the DMG and opens it in Finder. Drag the new Uplink.app to Applications and click Replace. Then repeat steps 7–9 above; macOS requires re-approval once per update since the app is not certificate-signed.
AppImage: run anywhere, update in-place
The AppImage bundles Uplink and its Qt libraries into a single executable file. It runs on any modern x86_64 Linux with glibc 2.35+. No package manager, no Qt install needed.
Run it
chmod +x Uplink-*.AppImage
./Uplink-*.AppImage
Update in-place (zsync)
The AppImage embeds zsync metadata pointing to the latest release. Install appimageupdatetool, then:
appimageupdatetool ./Uplink-*.AppImage
Only the changed blocks are downloaded, which is much faster than a full re-download.
Auto-update from inside Uplink
Click Help → Check for Updates. If a newer version is available, a dialog offers to download and install it automatically. For AppImage users, Uplink downloads the new AppImage, replaces the existing file in place, and relaunches. No terminal, no package manager, no sudo required.
Installed through the AUR or another system package? The checker notices and points you at your package manager instead: yay -Syu uplink-irc keeps it current with the rest of your system, and Uplink never fights pacman over the binary.
~/bin/ or ~/.local/bin/ and it will appear in your application launcher if your desktop environment supports AppImage integration (most do with libappindicator installed).
Install dependencies
If you're building from source, install these packages first. If you downloaded a pre-built binary, skip this section.
sudo pacman -S qt6-base qt6-svg cmake tomlplusplus
sudo apt install cmake qt6-base-dev libqt6svg6-dev libtomlplusplus-dev
sudo dnf install cmake qt6-qtbase-devel qt6-qtsvg-devel tomlplusplus-devel
sudo pkg install cmake qt6-base qt6-svg tomlplusplus
brew install cmake qt tomlplusplus
Then set Qt in your PATH: export PATH="$(brew --prefix qt)/bin:$PATH"
Install Qt 6 via the Qt Online Installer (select Qt 6.x → MSVC 2022 x64 or MinGW). Install CMake from cmake.org. tomlplusplus is fetched automatically by CMake if not found.
Build from source
Three commands. CMake downloads tomlplusplus automatically if your package manager doesn't have it.
git clone https://github.com/noderelay/UplinkIRC.git
cd Uplink
cmake -B build -DCMAKE_BUILD_TYPE=Release
cmake --build build
The binary is at build/Uplink (or build\Uplink.exe on Windows). Run it directly; on first launch Uplink creates ~/.config/uplink/themes/ and seeds it with all bundled themes automatically.
cmake --install build to produce a proper .app bundle, or launch build/Uplink.app/Contents/MacOS/Uplink directly.
First launch
On the very first run, Uplink creates your config file and may show a nick dialog asking for your nickname. Type the name you want to use on IRC and click OK.
The app then connects to irc.libera.chat and joins #uplinkirc automatically. You'll see the server list on the left, the chat area in the middle, and the user list on the right.

The menu bar across the top (File, Edit, View, Settings, Help, Find) carries the app actions; on KDE it docks into the global menu automatically. Preferences lives under Settings, or press Ctrl+,.
yournick. Click File → Open Config, set nick = "yournick" to your actual nick, save, and click File → Reload Config. Uplink will restart and connect.
Config file location
All settings live in a single config.toml file. Uplink creates it automatically on first launch.
| Platform | Path |
|---|---|
| Linux / FreeBSD | ~/.config/uplink/config.toml |
| macOS | ~/.config/uplink/config.toml |
| Windows | %USERPROFILE%\.config\uplink\config.toml |
Edit the file in any text editor. Uplink watches the file for changes: if you add or remove a [[server]] block while the app is running, the sidebar updates automatically. For other changes (theme, UI toggles, font sizes), click File → Reload Config to restart and apply everything. You can also click File → Open Config to open the file in your system editor directly from Uplink.
Set your nickname
Open config.toml and change the nick field in your server block:
[[server]]
name = "LiberaChat"
host = "irc.libera.chat"
port = 6697
ssl = true
nick = "alice"       # ← change this to your nick
user = "uplink"
realname = "Uplink User"
channels = "#uplinkirc"
Save, then click File → Reload Config. Uplink restarts and reconnects with the new nick. To change your nick while already connected without restarting, type /nick yournewnick in the input box.
Connect to Libera.Chat
Libera.Chat is the default network. You only need to set your nickname; everything else is already configured.
[[server]]
name = "LiberaChat"
host = "irc.libera.chat"
port = 6697
ssl = true
nick = "alice"
user = "uplink"
realname = "Uplink User"
channels = "#uplinkirc"
Save the file. Uplink detects the change and the server appears in the sidebar and connects automatically.
Connect to any IRC server
Add a [[server]] block for every server you want to connect to. The double brackets ([[]]) mean "add another entry to the list"; this is standard TOML array-of-tables syntax.
[[server]]
name = "Libera.Chat"
host = "irc.libera.chat"
port = 6697
ssl = true
nick = "alice"
user = "uplink"
realname = "Uplink User"
channels = "#linux, #archlinux"
ssl = true for public servers. Uplink also supports STS (Strict Transport Security): if the server advertises it, TLS is enforced automatically and the policy is cached for future connections, even if ssl is missing from your config.
Set
ssl = false with port 6667 only when TLS is genuinely unavailable: a local test IRCd on 127.0.0.1, a private LAN server with no certificate, a bouncer listening on loopback, or a .onion address where Tor provides its own encryption.
You can also connect to any server on the fly without editing config. Just type a command in the input box:
/server irc.libera.chat             # connects over SSL on port 6697 (default)
/server irc.example.org:6667        # connects plain-text on port 6667
/connect irc.oftc.net               # /connect is an alias for /server
The server appears in the sidebar immediately. Your nick is inherited from your first configured server. The sidebar label is derived from the hostname: irc.chatjunkies.org shows as CHATJUNKIES.
To close a server you connected to ad-hoc, right-click it in the sidebar and choose Close Server, or type /disconnect. The server is removed from the sidebar but not saved to config, so it won't reappear on next launch unless you add it to config.
Common IRC networks and their TLS hostnames:
| Network | Host | Port |
|---|---|---|
| Libera.Chat | irc.libera.chat | 6697 |
| OFTC | irc.oftc.net | 6697 |
| EFnet | irc.efnet.org | 6697 |
| IRCnet | open.ircnet.net | 6697 |
Auto-join channels
Set the channels key in a server block to a comma-separated list. Uplink joins them all automatically on connect.
[[server]]
name ="Libera.Chat"
host ="irc.libera.chat"
port =6697
ssl =true
nick ="alice"
user ="uplink"
realname = "Uplink User"
channels = "#linux, #archlinux, #python"   # join all three on connect
You can also set channels from the GUI: open File → Manage Servers, select the server, and fill in the Auto-join field on the right.
To join a channel while connected without editing the config, type /join #channelname in the input box.
Manage Servers dialog
Click File → Manage Servers... to add, edit, or remove servers from the UI, with no need to edit config.toml by hand for most settings. The dialog uses an integrated two-panel layout: server list on the left, server settings form on the right. Selecting a server loads its settings inline. Changes take effect immediately.
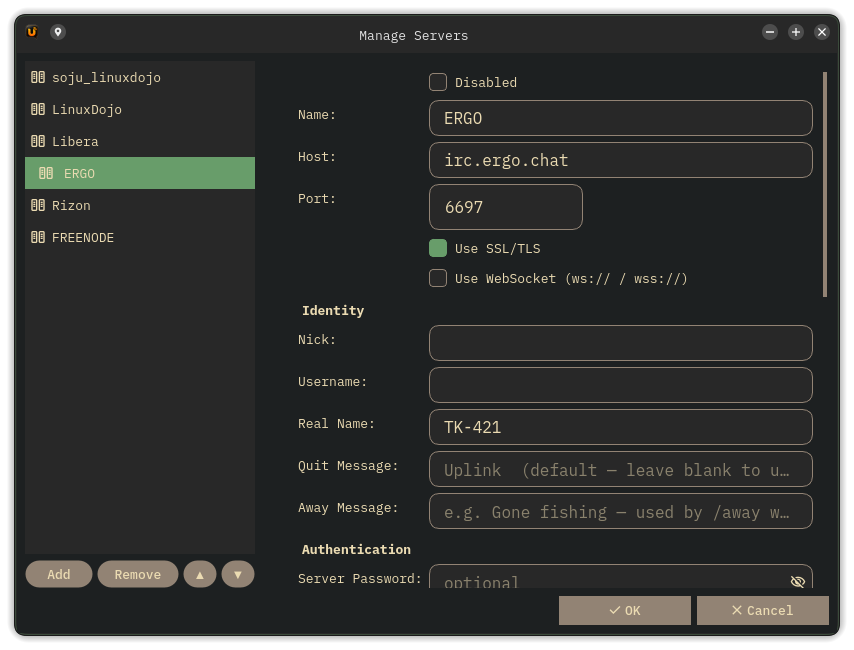
Adding a server
| Section | Fields |
|---|---|
| Connection | Disabled checkbox (keep in config, skip on startup), Name (display name in sidebar, must be unique across all servers), Host, Port, SSL checkbox |
| Identity | Nick, Username, Real Name, Quit Message, Away Message |
| Authentication | Server Password (bouncers / password-protected servers); SASL User + SASL Password (SASL PLAIN); SASL EXTERNAL checkbox + Client Cert + Client Key, each with a Browse button to pick the file; NickServ password (auto-identifies on connect) |
| Channels | Auto-join, comma-separated (e.g. #uplinkirc, #linux). See note below for password-protected channels. |
| Bouncer | Type: None / ZNC / Soju. Network field (appears for both ZNC and Soju). |
| SOCKS5 Proxy | Host, Port, Username (optional), Password (optional). Leave host blank for direct connection. |
config.toml directly using the [[server.channel]] format; the dialog shows a reminder with the exact format to use.
Editing a server
Select the server in the left panel and its settings load in the right panel. Edit the fields you want to change and click OK. The server disconnects and reconnects with the updated settings immediately.
Reordering servers
Select a server in the list and click ▲ or ▼ to move it up or down. The new order is saved to config.toml when you click OK. You can also right-click a server header in the sidebar and choose Move Up or Move Down.
Removing a server
Select the server in the list and click Remove. The server disconnects, is removed from the sidebar, and is deleted from config.toml.
Disabling a server
If you want to keep a server in your config without connecting to it on startup, set disabled = true in the server block:
[[server]]
disabled = true
name ="Libera"
host ="irc.libera.chat"
port =6697
ssl =true
nick ="yournick"
channels = "#linux"
Uplink skips the server completely (no connection attempt, no sidebar entry) but preserves the block and writes it back on every config save. Re-enable it any time by removing the line or setting it to false.
Using the GUI
To re-enable, select the server again and uncheck Disabled; the server reconnects immediately.
[[server]] blocks. Commented entries are not parsed by Uplink. The next time the app writes config.toml (which happens on any Preferences change, theme switch, or /ignore command) it does a full rewrite from memory and the commented block is permanently removed. Use disabled = true instead.
Quit & away messages
Quit message
The quit message is shown to other users when you disconnect: *** yournick has quit (your message).
[[server]]
name = "LiberaChat"
host = "irc.libera.chat"
port = 6697
ssl = true
nick = "yournick"
quit_message = "Later!"
This is used when you disconnect normally or type /quit with no argument. To override for a single disconnect: /quit See you tomorrow. If unset, Uplink sends "Uplink".
GUI: Open File → Manage Servers, select the server, and fill in Quit Message in the Identity section on the right.
Away message
The away message is sent when you type /away with no argument. Users who message you while you are away receive it as an automatic server reply.
[[server]]
name = "LiberaChat"
host = "irc.libera.chat"
port = 6697
ssl = true
nick = "yournick"
away_message = "Away from keyboard, back soon"
| Command | Behaviour |
|---|---|
/away | Uses configured away_message; if none set, clears away status |
/away Back in 10 | Overrides for this session only |
/back | Always clears away regardless of config |
GUI: Open File → Manage Servers, select the server, and fill in Away Message in the Identity section on the right.
Full example with both
[[server]]
name = "LiberaChat"
host = "irc.libera.chat"
port = 6697
ssl = true
nick = "yournick"
user = "uplink"
realname ="Uplink User"
quit_message = "Later!"
away_message = "Away from keyboard, back soon"
channels = "#uplinkirc, #linux"
Password storage: OS keychain
Uplink stores all passwords in your OS keychain, not as plaintext in config.toml.

| Platform | Backend |
|---|---|
| Linux | Secret Service (GNOME Keyring, KWallet, or any compatible daemon) |
| macOS | macOS Keychain |
| Windows | Windows Credential Manager |
After saving, your config file will show "<keychain>" as a sentinel in place of the actual secret:
nickserv_password = "<keychain>" # actual value is in the OS keychain
When you select a server in Manage Servers that has a keychain-stored password, the password field shows a placeholder, Stored in keychain - type to change, clear to remove, rather than the sentinel as masked dots. This makes it clear a password exists. Leaving the field unchanged and saving preserves the keychain entry. Typing a new password overwrites it. Explicitly clearing the field removes the entry.
All password fields have a 👁 show/hide toggle: click the eye icon on the right edge of any password field to reveal the value, and click again to re-mask it.
qWarning messages from Uplink if authentication is failing unexpectedly.
<keychain> as a sentinel, but no matching entry exists in the OS keychain; the password was never written there (or the entry was cleared). Fix: open File → Manage Servers, select the server, type your password in the affected field, and save. Uplink will write it to the keychain and authenticate normally from that point on.
name field. If you change the name (e.g. from znc_libera to soju_libera), the keychain entry stays under the old name and the renamed server will fail to authenticate. Fix: open File → Manage Servers, select the renamed server, re-enter the password, and save.
NickServ auto-identify
If you have a registered nick on a server, add nickserv_password. Uplink sends PRIVMSG NickServ :IDENTIFY yourpassword automatically after connecting.
[[server]]
name = "LiberaChat"
host = "irc.libera.chat"
port = 6697
ssl = true
nick = "alice"
user = "uplink"
realname = "Uplink User"
channels = "#uplinkirc"
nickserv_password = "mysecretpassword"   # ← add this
The server buffer shows Sent NickServ IDENTIFY when it fires. For networks that support SASL, use that instead (below); SASL identifies you before you even appear on the network.
SASL PLAIN authentication
SASL is the preferred way to authenticate on Libera.Chat, OFTC, and other modern IRC networks. It logs you in during the connection handshake, before you appear to other users.
[[server]]
name = "Libera.Chat"
host = "irc.libera.chat"
port = 6697
ssl = true
nick = "alice"
user = "uplink"
realname = "Uplink User"
channels = "#linux"
sasl_user ="alice"            # ← your registered nick
sasl_password = "mysecretpassword" # ← your NickServ password
The server buffer shows SASL authentication successful on connect. If it fails, the connection continues; you'll just appear without services authentication.
nickserv_password for servers that don't (older networks).
SASL EXTERNAL (certificate authentication)
SASL EXTERNAL authenticates you by your TLS client certificate instead of a password. The server derives your identity from the certificate's fingerprint; nothing is ever typed or transmitted. Supported on Libera.Chat, OFTC, and most modern IRC servers.
1. Generate a client certificate
# RSA (most compatible)
openssl req -newkey rsa:4096 -nodes -x509 -days 3650 \
  -keyout ~/.irc/client.key -out ~/.irc/client.crt \
  -subj "/CN=yournick"

# EC (smaller, equally secure)
openssl req -newkey ec -pkeyopt ec_paramgen_curve:P-384 -nodes -x509 -days 3650 \
  -keyout ~/.irc/client.key -out ~/.irc/client.crt \
  -subj "/CN=yournick"
2. Register the fingerprint with NickServ
Connect once with your password, then add the certificate fingerprint:
/msg NickServ cert add
The server extracts the fingerprint automatically from your certificate.
3. Configure Uplink
[[server]]
name = "Libera.Chat"
host = "irc.libera.chat"
port = 6697
ssl = true
nick = "alice"
user = "uplink"
realname = "Uplink User"
channels = "#linux"
sasl_external = true
client_cert = "/home/alice/.irc/client.crt"
client_key = "/home/alice/.irc/client.key"
Uplink loads the certificate before the TLS handshake, negotiates AUTHENTICATE EXTERNAL, and sends an empty response. Both RSA and EC (ECDSA) PEM keys are supported.
You can also set the cert and key paths from the GUI: open File → Manage Servers, select the server, then tick SASL EXTERNAL in the Authentication section and browse to your files.
sasl_user / sasl_password alongside sasl_external; only one SASL mechanism is used per connection.
STS: Strict Transport Security
STS is an IRCv3 security feature that prevents your IRC client from ever being silently downgraded to a plain-text connection. It works exactly like HSTS in web browsers: once a server tells Uplink "always connect over TLS," that instruction is remembered and enforced automatically on every future connection.
How it works
During the initial CAP handshake, a server that supports STS sends a policy containing a TLS port and a duration (how long to enforce it). Uplink handles everything automatically from there:
| Scenario | What Uplink does |
|---|---|
| Plain connection, server advertises STS | Immediately disconnects and reconnects over TLS on the server-specified port. Stores the policy. |
| TLS connection, server advertises STS | Refreshes the stored policy expiry. No reconnect needed, already encrypted. |
Server sends duration=0 | Deletes the cached policy. Plain connections permitted again. |
| Cached policy is expired | Removed automatically on the next connection attempt. |
What you'll see
The first time STS triggers an upgrade from plain to TLS, a line appears in the server buffer:
STS: upgrading to TLS on port 6697
After that the connection continues normally; you're now on TLS. On all future connections the stored policy is applied silently before the socket is even opened, so you won't see the message again.
Where the policy is stored
~/.config/uplink/sts.ini
Each entry records the host, TLS port, and an expiry timestamp. Uplink checks this file before dialing any server. If a valid policy exists for the host, TLS is used regardless of what ssl is set to in config.toml.
ssl = true in your config as usual; STS provides an additional layer that protects you even if that setting is ever wrong or missing. Most modern networks already support it: Libera.Chat and OFTC both advertise STS policies.
Two servers at the same time
Add one [[server]] block per server. Uplink connects to all of them on launch and shows each one in the sidebar independently.
[ui]
theme = "catppuccin-mocha"

[[server]]
name ="LiberaChat"
host ="irc.libera.chat"
port =6697
ssl =true
nick ="alice"
user ="uplink"
realname = "Uplink User"
channels = "#uplinkirc"

[[server]]
name = "Libera.Chat"
host = "irc.libera.chat"
port = 6697
ssl = true
nick = "alice"
user = "uplink"
realname = "Uplink User"
channels = "#linux, #archlinux"
sasl_user ="alice"
sasl_password = "mysecretpassword"
Each server's channels appear under its heading in the sidebar. Click any channel to switch to it.
ZNC bouncer
A bouncer is a program that sits between you and IRC. It stays connected 24/7 so you never miss messages; when you open Uplink it replays everything that arrived while you were away. ZNC is the most widely used bouncer.
How ZNC authentication works
ZNC identifies clients through the IRC Server Password using this format:
username/network:password
- username: your ZNC login name (set when ZNC was installed)
- network: the name of the IRC network inside ZNC (e.g.
libera,oftc). Check your ZNC web panel or run/znc ListNetworksin Uplink's server buffer to see the exact names. - password: your ZNC account password
Uplink assembles this string for you automatically. You just supply the three pieces separately and Uplink constructs username/network:password at connect time.
znc.example.com:6697), not at the IRC network. ZNC is the middleman: it stays connected to IRC on your behalf and Uplink connects to ZNC.
Setting up ZNC in Manage Servers
6697 for SSL). Check Use SSL/TLS if your ZNC has SSL enabled (recommended).username/network:password string ZNC expects.#linux, #archlinuxlibera). Click OK.username/network:password string directly in the Server Password field and leave SASL User, SASL Password, and Network blank. Uplink sends it as-is.
Config file equivalent
The Manage Servers dialog writes this to config.toml for you, but you can also edit it directly. The recommended form uses separate fields, and Uplink assembles the ZNC PASS string automatically:
[[server]]
# Uplink connects to ZNC, which connects to Libera on your behalf.
# host/port point at your ZNC server, not at irc.libera.chat.
name = "ZNC → Libera"
host = "znc.example.com"   # your ZNC server
port = 6697
ssl = true
nick = "alice"
user = "alice"
realname = "Alice Smith"
sasl_user = "alice"             # ZNC username
sasl_password = "hunter2"           # ZNC password
bouncer = "znc"
bouncer_network = "libera"            # network name inside ZNC
channels = "#linux, #archlinux"
What ZNC mode enables
Setting bouncer = "znc" (or selecting ZNC in the dialog) tells Uplink to negotiate two ZNC-specific IRCv3 capabilities:
| Capability | What it does |
|---|---|
znc.in/playback | Requests all messages that arrived since your last disconnect. Uplink asks for them automatically on connect, so you see your missed messages instantly at reduced opacity. |
znc.in/self-message | Echoes messages you sent from other IRC clients (phone, another PC) back into Uplink so your conversation history stays complete. |
Multiple networks on one ZNC
ZNC can carry several IRC networks simultaneously. Add a separate Uplink server entry for each one: same host, port, and credentials, only bouncer_network changes:
[[server]]
name = "ZNC → Libera"
host = "znc.example.com"
port = 6697
ssl = true
nick = "alice"
user = "alice"
realname = "Alice Smith"
sasl_user = "alice"
sasl_password = "hunter2"
bouncer = "znc"
bouncer_network = "libera"
channels = "#linux"

[[server]]
name = "ZNC → OFTC"
host = "znc.example.com"
port = 6697
ssl = true
nick = "alice"
user = "alice"
realname = "Alice Smith"
sasl_user = "alice"
sasl_password = "hunter2"
bouncer = "znc"
bouncer_network = "oftc"
channels = "#debian"
/znc ListNetworks in the server buffer. ZNC will reply with the exact names to use.
Troubleshooting
| Symptom | Likely cause |
|---|---|
| Password incorrect / access denied | Wrong format; double-check username/network:password. The network name must match exactly what ZNC has (case-sensitive on some ZNC versions). |
| Connected but no channels join | The channels in Auto-join don't exist on that ZNC network, or ZNC is set to manage joins itself. Check ZNC's channel settings in its web panel. |
| No message history on connect | znc.in/playback not loaded in ZNC. Enable the playback module in ZNC's web panel under your network's modules. |
| TLS errors | Port mismatch; ZNC's SSL port is usually different from the plain port. Check the ZNC web panel under Global Settings → Listeners. |
soju bouncer
soju is a modern IRC bouncer with deep IRCv3 support. It is simpler to configure than ZNC and handles multiple networks cleanly. If you are running your own bouncer, soju is worth considering.
How soju authentication works
soju uses SASL PLAIN for authentication, but Uplink handles this transparently when you select the soju bouncer type. You just put your credentials in the Server Password field in the simpler username:password format (no network name needed here):
alice:hunter2
Setting up soju in Manage Servers
6697 SSL. Check Use SSL/TLS.username:password. Example: alice:hunter2. Leave SASL fields blank.libera). If soju only has one network, leave it blank.Config file equivalent
[[server]]
name = "soju → Libera"
host = "soju.example.com"
port = 6697
ssl = true
nick = "alice"
user = "alice"
realname = "Alice Smith"
password = "alice:hunter2"   # soju: username:password
bouncer = "soju"
bouncer_network = "libera"          # omit if soju only manages one network
channels = "#linux"
What soju mode enables
| Capability | What it does |
|---|---|
soju.im/bouncer-networks | Lists all IRC networks your soju manages in the server buffer on connect as a formatted summary: network name and connection state for each. |
soju.im/read | Syncs your read position across all connected clients. If you read a message on your phone, Uplink on your desktop already knows. (On direct connections, servers like Ergo offer the same sync via the standard draft/read-marker capability.) |
chathistory / draft/chathistory | Requests missed messages on each channel join. Supported by soju, ZNC, and Ergo IRCd. History arrives with original timestamps. |
Multiple networks on one soju
Add one Uplink server entry per IRC network. The password is the same; only bouncer_network changes:
[[server]]
name = "soju → Libera"
host = "soju.example.com"
port = 6697
ssl = true
nick = "alice"
user = "alice"
realname = "Alice Smith"
password = "alice:hunter2"
bouncer = "soju"
bouncer_network = "libera"
channels = "#linux"

[[server]]
name = "soju → OFTC"
host = "soju.example.com"
port = 6697
ssl = true
nick = "alice"
user = "alice"
realname = "Alice Smith"
password = "alice:hunter2"
bouncer = "soju"
bouncer_network = "oftc"
channels = "#debian"
bouncer_network. soju will list all available networks in the server buffer automatically via soju.im/bouncer-networks.
chathistory or draft/chathistory CAP). Uplink requests the last 100 messages for each channel on join. History messages appear dimmed in gray with their original timestamps so you can tell them apart from live messages.
soju server administration
This section covers setting up and managing soju on the server side. The examples use FreeBSD, but the commands are the same on Linux; only the paths differ.
Install soju
# FreeBSD
pkg install soju

# Arch Linux
pacman -S soju

# From source (any platform)
go install git.sr.ht/~emersion/soju/cmd/...@latest
Configuration file
The soju config lives at /usr/local/etc/soju/config on FreeBSD or /etc/soju/config on Linux. A minimal config:
db sqlite3 /var/db/soju/main.db
listen ircs://:6697
tls /path/to/fullchain.pem /path/to/privkey.pem
hostname irc.example.com
listen unix+admin://
The listen unix+admin:// line creates the admin socket that sojuctl uses. Without it, sojuctl commands will fail with a "no such file or directory" error.
listen ircs://:7778. Clients connect to the soju port, not the IRC server port.
Start soju
# FreeBSD
service soju start

# systemd (Linux)
systemctl start soju

# Check it's running
ps aux | grep soju
Create a user
sudo sojuctl user create -username alice -password secretpass
To see available commands:
sudo sojuctl help
user list command. To see existing users, query the database directly:
sudo sqlite3 /var/db/soju/main.db "SELECT username FROM User;"
Reset a user's password
sudo sojuctl user update alice -password newpassword
Check user status
sudo sojuctl user status alice
This shows how many upstream networks the user has and whether they are connected.
Add an upstream network
Connect to soju with your IRC client, then message BouncerServ:
/msg BouncerServ network create -addr ircs://irc.example.com:6697 -nick alice
To authenticate to the upstream server, add a NickServ IDENTIFY command:
/msg BouncerServ network create -addr ircs://irc.example.com:6697 -nick alice -connect-command "PRIVMSG NickServ :IDENTIFY myircpassword"
To see what flags network create accepts on your version:
/msg BouncerServ help network create
Check and manage networks
/msg BouncerServ network status
Or from the server shell:
sudo sqlite3 /var/db/soju/main.db \
  "SELECT id, name, addr, nick FROM Network WHERE user = (SELECT id FROM User WHERE username = 'alice');"
Delete a network by name via BouncerServ:
/msg BouncerServ network delete irc.example.com
Or delete by ID directly in the database:
sudo sqlite3 /var/db/soju/main.db "DELETE FROM Network WHERE id = 3;"
sudo service soju restart
Manage channels in the database
soju remembers which channels you have joined. To see them:
sudo sqlite3 /var/db/soju/main.db "SELECT id, network, name FROM Channel WHERE network = 5;"
To remove a stale or mistyped channel:
sudo sqlite3 /var/db/soju/main.db "DELETE FROM Channel WHERE id = 7;"
/part #badchannel from your client; soju removes it from its database automatically.
Common gotchas
| Problem | Cause | Fix |
|---|---|---|
sojuctl says "no such file or directory" | soju is not running, or listen unix+admin:// is missing from config | Start soju and check the config |
sojuctl says "permission denied" | The admin socket is owned by the soju user | Run with sudo |
Nick shows as alice_ or alice__ | Another connection is already using that nick, often a duplicate network or a ghost from a crashed session | Delete the duplicate network; /raw KILL alice_ if you have IRC oper access |
| Duplicate channels in your client | Channels listed in both the client config and soju's database, or two networks connecting to the same server | Remove channels from the client config and let soju manage them; delete duplicate networks |
| "Cannot interact with channels … Did you mean to use a specific network?" | You are typing in soju's control connection, not the upstream network | Set bouncer_network in your client config, or put username/networkname in the Username field |
| NickServ authentication fails | The -connect-command was on a network you deleted; the new auto-created network doesn't have it | Re-add the connect command: /msg BouncerServ network update networkname -connect-command "PRIVMSG NickServ :IDENTIFY password" |
Database location
soju stores everything in a SQLite database. The path is set in the config file (db sqlite3 /path/to/main.db). Useful tables:
| Table | Contents |
|---|---|
User | Bouncer user accounts (username, hashed password, admin flag) |
Network | Upstream IRC server connections (address, nick, credentials) |
Channel | Joined channels per network |
Chat history replay
When you join a channel, Uplink automatically requests the last 100 messages from the server using the IRCv3 chathistory capability. The messages appear at the top of the chat window, dimmed slightly and stamped with their original timestamps, so you can catch up on what you missed without doing anything extra.
This works on any server or bouncer that supports the chathistory or draft/chathistory IRCv3 capability, with no config change needed. Uplink requests both cap names automatically.
Servers that support chat history
| Server / Bouncer | Cap name advertised | Notes |
|---|---|---|
| Ergo IRCd | draft/chathistory | Requires history: block in ircd.yaml and a server restart (not just rehash) to initialise the history DB. |
| soju | chathistory | Works out of the box; soju stores and replays history natively. |
| ZNC | chathistory | Requires the playback module. Uplink enables it automatically when bouncer = "znc". |
chathistory cap. The feature simply does not activate; you will not see an error. On those networks Uplink falls back to its own log files instead: with Log Messages to Disk enabled, opening a buffer loads the last 100 logged lines and scrolling up pages further back. See Scrollback history loading.
What history messages look like
History messages are visually distinct from live messages:
- Displayed at reduced opacity (dimmed).
- Timestamped with their original send time. Messages from a previous day include the date:
06/08 14:32. - Not counted as unread; they do not badge the channel in the sidebar.
Connecting to an Ergo server with history
No special config is needed on the client side. A normal SSL server entry works:
[[server]]
name ="LiberaChat"
host ="irc.libera.chat"
port =6697
ssl =true
nick ="yournick"
user ="uplink"
realname = "Uplink User"
channels = "#uplinkirc, #linux"
On connect, Uplink negotiates draft/chathistory with Ergo. After you join each channel, it sends:
CHATHISTORY LATEST #uplinkirc * 100
Ergo replies with a batch of up to 100 recent messages and Uplink renders them into the chat window automatically.
history: block is enabled in ircd.yaml and that Ergo was fully restarted (not just rehashed) after enabling it. A rehash alone is not enough to initialise the history database.
How many messages are replayed?
Uplink always requests the last 100 messages per channel. The server may return fewer if the channel has less history stored. There is currently no config option to change this limit.
Server-side persistence (no bouncer needed)
A bouncer exists to keep you on the network when your client is closed. Some servers can do that themselves: Ergo calls it always-on, and you stay joined to your channels, keep your nick, and collect history while nothing is connected. The IRCv3 draft/persistence capability makes that setting visible to the client instead of leaving it buried in your account config.
When the server supports it, Uplink reads your persistence state during connection and prints it in the buffer you are looking at:
Persistence: on (your setting: default)
The first value is what is actually in effect. The second is your own preference, which can be on, off, or default (follow whatever the server decides for accounts like yours).
Changing it
Use /persistence in any buffer on that server:
| Command | What it does |
|---|---|
/persistence | Report the current state |
/persistence on | Ask the server to keep you online while disconnected |
/persistence off | Ask it not to |
/persistence default | Follow the server's default for your account |
The server confirms with a fresh status line. It is allowed to refuse: if it does, you get a note explaining why and the state stays as it was.
FAIL PERSISTENCE ACCOUNT_REQUIRED. On servers that do not advertise the capability at all, /persistence says so and sends nothing.
WebSocket transport
Most IRC servers accept plain TCP connections (port 6667) or TLS connections (port 6697). Some modern servers and bouncers, particularly web-based ones like The Lounge, are only reachable over WebSocket (ws:// / wss://). Uplink supports both transports.
To use WebSocket, add websocket = true to the server block. When ssl = true is also set, Uplink connects with wss:// (encrypted). When ssl = false, it uses ws:// (plain).
[[server]]
name = "The Lounge"
host = "lounge.example.com"
port = 9000
ssl = true
websocket = true
nick = "alice"
user = "uplink"
realname = "Uplink User"
channels = "#uplinkirc"
You can also enable WebSocket from the GUI: open File → Manage Servers, select the server, and tick the Use WebSocket checkbox in the Connection section on the right.
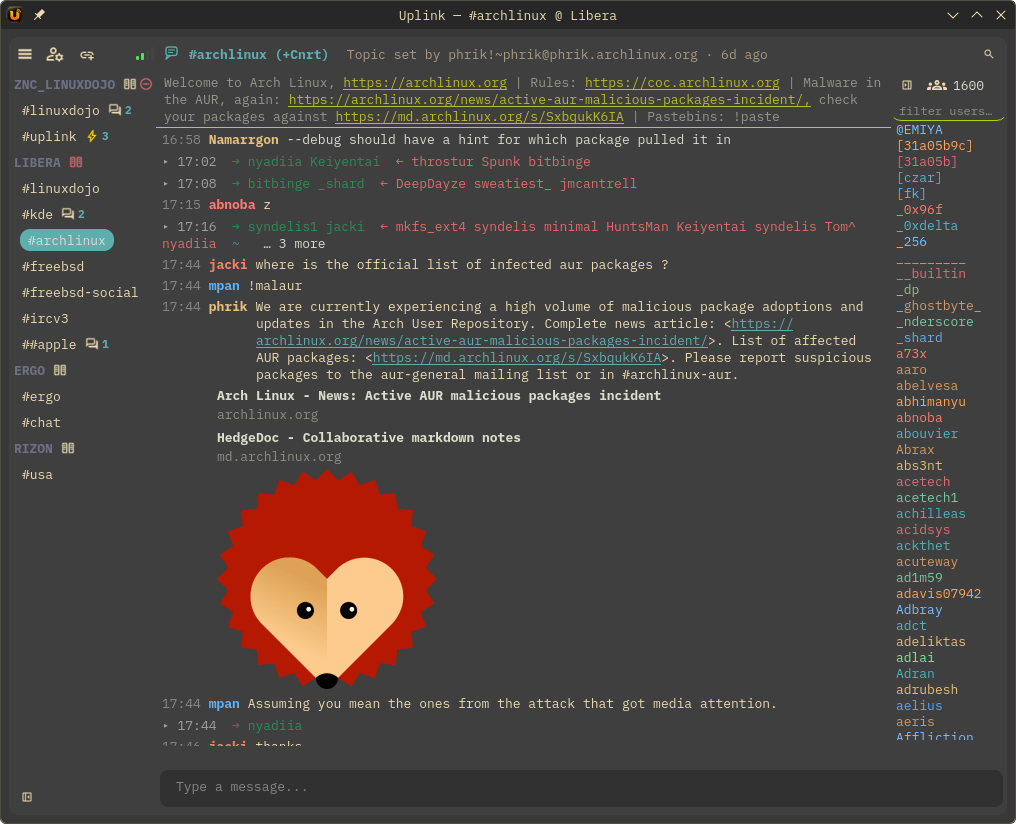
The channel header
The channel header row runs across the top of the chat area (right of the sidebar divider). From left to right:
- 📶 Signal bars: connection quality for the active server (see Signal bars).
- ▸ Topic button: shows or hides the topic text below the header. Icon is grey when topic is hidden, accent-colored when visible.
- #channel (+modes): the active channel name and its mode string.
- 🔍 Search: opens the search bar (same as Ctrl+F).
- ✕ Close: closes the primary channel pane.

Sidebar: server & channel list
The sidebar on the left shows all your servers and channels. It is drawn as its own rounded floating card, framed by an even backdrop gap on every side; the user list on the right gets the same treatment, so the two side cards and the message box share one uniform gutter. Each server is a heading; its channels are listed beneath it.

- Click a channel to open it in the chat area.
- Channels with new activity show a small forum icon after the channel name. Channels where your nick was mentioned show a yellow lightbulb icon instead.
- The server heading shows a globe icon when connected. The globe turns red when the server status pane has unread messages; click the server name to open it and clear the indicator.
- Right-click a channel for options: Open in Pane (view it alongside the current channel), Open in Window (float it into its own window), Rejoin, Leave, Close. See Channel panes.
- Right-click a server for: Disconnect, Reconnect, Close Server (removes from sidebar without deleting from config), Move Up, Move Down (reorder servers, saved to config).
- Drag the divider between the sidebar and the chat area to resize it; the width is saved and restored on the next launch.
- Click the close button in the top-left corner of the sidebar panel to collapse the sidebar so the chat fills the card. A reveal button appears at the bottom-left of the chat area; click it to bring the sidebar back.
Channel panes: view multiple channels at once
Uplink can display several channels side by side in the chat area, as many as the window has room for. Each pane is fully self-contained: it has its own chat history, nick list, topic bar, and input bar. The pane's user list carries the same controls as the main view: the hide/reveal toggle, the user count, and the filter users box.

Opening a pane
Right-click any #channel in the sidebar and choose Open in Pane. The channel opens as a new column next to the current view. You can continue typing in either pane independently. Each pane header carries its own pop-out and search buttons alongside the topic toggle and close button, mirroring the main channel header.
Layout
Opening a pane splits an existing view in half. Uplink picks the roomiest view on screen and halves it along its longer side, so panes stay as close to square as the window allows: the first pane splits the main view down the middle, the next splits whichever half now has the most space, and so on. There is no fixed arrangement per pane count, which means three views can be three equal columns, three equal rows, or one full-height view beside a stacked pair, depending on how you got there.
The splitter handles between panes are draggable so you can resize any column or row to suit your screen. When a pane gets narrow, the header text shortens with an ellipsis (hover it for the full channel name), and a column stops at its minimum width rather than collapsing; use the ✕ in a pane's header when you want it gone.
Which way each split runs is decided for you: a view wider than it is tall splits into columns, a taller one into rows. Splitting the long way is what keeps both halves readable. Every split keeps its own direction, so one column can hold a stack of rows while the column beside it holds a single view.
If you would rather not have it decided, untick Preferences → Interface → Split Panes Automatically and pick a direction. That flattens the whole layout onto one axis and keeps it there: three panes with rows forced are three equal rows, full width, top to bottom. Ticking the box again hands the choice back to the shape of each view. Either way the setting is written to pane_split_axis in config.toml.
Changing what a pane shows
A pane is not stuck with the channel you opened it on. Click inside a pane (its input bar, chat area, or nick list) and then left-click a channel in the sidebar: that channel loads into the pane you were last typing in, and the layout does not move. Click in the main view first and sidebar clicks go back to loading there, as usual. Focus is what decides the target, so Alt+Left / Alt+Right followed by a sidebar click works too. With the main view collapsed by its ✕, every sidebar click loads into a pane, whether or not you have clicked into one.
A channel can only be in one place at a time. Pick a channel that is already open in another pane or a popped-out window and nothing happens; the sidebar highlight simply snaps back to the view you are working in. (The highlight always follows your keyboard focus: click into a pane and its channel lights up in the sidebar, click back into the main view and its channel takes over.) Pick the channel the main view is currently on and the two trade places: the pane takes that channel and the main view picks up the channel the pane was showing. Whatever you had half-typed in the pane is kept with the channel you left, and typing it again when you come back is not necessary.
Rearranging panes
Click and drag any pane's header bar to rearrange it, the primary view included. The pane lifts out and follows your cursor as a snapshot, and its old spot fills with a placeholder in the theme's panel color until you drop. While you drag, the target under the cursor is outlined with a highlight frame. Where that frame sits tells you what the drop will do: around the whole pane means the two will swap positions, and along one edge means the dragged pane will be placed on that side instead. Drop it in the middle of another pane to swap their positions. Drop a pane on the primary channel area instead, and the dragged pane stays exactly where it is; the primary view joins it there, while whichever pane it displaces takes over the primary's old spot. If the dragged pane already shares a stack with the primary, the two simply swap places. The layout rebuilds instantly without losing any content. The cursor keeps the grab hand for the whole gesture, and releasing anywhere that isn't a highlighted target simply cancels the drag; the pane stays where it was.
Dropping on an edge places rather than swaps. Release over the left or right quarter of a view and the dragged pane takes that side of it; release over the top or bottom quarter and it lands above or below. Only that split changes direction, so the rest of the layout stays exactly as it was and Split Panes Automatically keeps steering the splits you haven't touched. Dropping a pane below another that already sits directly above it produces three equal rows rather than a pane nested inside a pane.
You can also cycle keyboard focus between the open panes without touching the mouse: Alt+Left / Alt+Right moves focus through the pane input bars (the primary input included), in layout order.
Popping a channel out into its own window
Any channel can float free of the main window as a standalone window, handy for a second monitor or keeping one conversation visible while you work elsewhere. There are three ways to do it:
- From the channel header: click the pop-out icon (picture-in-picture) just to the left of the search magnifier to pop out the channel you are currently viewing.
- From a pane: every pane header has the same pop-out icon; click it to float that pane into its own window.
- From the sidebar: right-click a
#channeland choose Open in Window.
While a channel is popped out it is checked out of the main window: its sidebar row is dimmed and italic, and clicking it simply raises its window instead of loading it into the main view. Everything stays live in the window: incoming messages, link previews, the nick list, the typing indicator, tab completion, and search all work exactly as they do in the main window.
To bring it back, close the window (its close button uses an exit picture-in-picture icon) or press the pane's ✕; the channel returns to the main view and its sidebar row un-dims. You never leave the channel. Popped-out windows are remembered across restarts, just like docked panes, and each window's size and position are remembered per channel, so popping the same channel out again puts its window right back where you last had it.
Per-pane search and typing indicator
Every pane and popped-out window carries the same search magnifier in its header; click it to search that pane's own scrollback, and press Esc to close. Ctrl+F does the same: with focus inside a docked pane it opens that pane's search bar, and popped-out windows respond to Ctrl+F on their own. The typing indicator also appears in each pane and window, showing who is typing in that specific channel. The compose area (typing line plus input bar) sits on the same chat background as the main window for a consistent look.
Per-pane topic bar
Each pane has a header bar showing the channel name. Click the small speech bubble icon on the left of the header to show or hide the channel topic below it. The topic updates live whenever it changes on the server. The icon is muted (grey) when the topic is hidden and turns accent-colored when the topic is visible, so you can read the state at a glance without clicking.
Closing a pane
Click the ✕ button on the right of any pane header to close that pane. The remaining panes expand to fill the freed space and the layout restructures automatically. Closing a pane does not leave the channel; it just removes the split view for it.
You can also right-click the channel in the sidebar and choose Close Pane.
Primary column header
The primary channel always has a header bar at the top containing:
- A speech bubble icon; click to show or hide the primary channel's topic text independently of the global Preferences setting. The icon is muted when the topic is hidden and accent-colored when visible. It is always present, even in single-window mode with no extra panes open.
- The current channel name in bold.
- A
✕button, only visible when extra panes are open. Collapses the primary column so the panes fill the screen. While it is collapsed the panes are the whole window: clicking a channel in the sidebar loads it into the pane you were last typing in rather than reopening the primary column, and the sidebar highlight follows that pane. Close the last pane to bring the primary column back.
Pane layout persistence
Uplink remembers the whole layout when you quit: which channels were open, how the views were split, and how far you dragged each divider. The next launch puts them back the way you left them, in the same proportions, scaled to whatever size the window is now, so moving between a laptop screen and an external monitor keeps the arrangement rather than the pixel widths. A channel that no longer comes back is simply dropped from the layout and the views around it take its space. A primary column you collapsed with its ✕ stays collapsed too, so a window you left showing one pane starts as one pane; if none of the panes come back, the primary column is restored rather than leaving you an empty window.
Limits and notes
- Panes stop when the space does. A view only splits while both halves would stay wide (or tall) enough to read, so a large window takes more panes than a small one; there is a hard ceiling of 8 views as a backstop. Popped-out windows are separate, up to 4 at a time.
- No unread counters for visible channels. A channel open in a pane or popped-out window never accumulates an unread badge in the sidebar; you're already looking at it. Once the pane or window closes, unread counting resumes as normal.
- The same channel never appears in both the primary view and a pane at the same time. If you open a channel that is already shown in the primary, the primary shifts to the server buffer automatically. Left-clicking a channel that is already open in a pane just keeps the primary view where it was; it does not also load it there.
- All slash commands work in pane input bars:
/join,/nick,/me, and every other command behave the same as in the primary input bar. - Tab completion works in pane input bars. Pressing Tab completes nicks from that pane's own channel, not the primary channel, so you always get the right suggestions regardless of which input is focused.
- Pane inputs match the primary input.
:emojiautocomplete and shortcode substitution, Up/Down send history (one list shared across every input), Ctrl+B/I/U/S/O and color formatting with the same corner badge, and outgoing typing notifications all work the same in a pane. Replying from a pane shows who you are replying to in the input placeholder; Esc cancels it. - Everything acts on the pane's own channel. Right-clicking a nick in a pane's chat or user list gives the full menu — Kick, Ban, Op, CTCP, DCC — aimed at that pane's channel, CTCP replies come back to the buffer that asked, and
/clearclears the buffer it was typed in. - Font sizes set in Preferences → Font Config apply consistently to all panes: chat text, nick list, topic bar, and input label all inherit the same configured sizes whether the pane is opened at launch or mid-session.
- Right-clicking anywhere on a message in a pane gives the same context menu as the primary view: Reply, React, Delete (your own messages), and Copy (when text is selected).
Event condensation
In busy channels, individual join, part, quit, nick-change, and kick lines would otherwise flood the chat view. Uplink automatically collapses consecutive server events into a single compact line:
21:03 ▸ → halloy2109 sumeetj_ bustacheeze ← CrystalDotGay AJ_Z0

The symbols mean:
| Symbol | Event |
|---|---|
| → | Nick joined the channel |
| ← | Nick parted or quit |
| ~ | Nick rename, shown as oldNick→newNick |
| ✕ | Nick was kicked |
Expanding a group to see details
Every condensed group has a ▸ expand indicator at the left edge. Click it to expand the group in-place and see every event as a full line, with hostmasks and quit/part reasons:
21:03  ▾
21:03  ← CrystalDotGay (~crystal@2600:1700:...) has quit (Ping timeout: 252 seconds)
21:03  ← AJ_Z0 (~AJ@user/aj-z0) has quit (Remote host closed the connection)
21:03  → halloy2109 (~halloy210@208.59.60.21) has joined #uplinkirc
21:03  → sumeetj_ (~sumeet@103.145.17.55) has joined #uplinkirc
21:03  → bustacheeze (~bust@user/bustacheeze) has joined #uplinkirc
Click ▾ to collapse the group back to the compact view. Expanded state persists when you switch channels and come back.
This is particularly useful for:
- Seeing the full hostmask of someone who just joined (to check for a ban match, for example)
- Reading quit and part reasons without /whowas
- Verifying exactly when each event happened when multiple nicks arrive in the same second
How grouping works
Events are grouped purely by position in the message stream; no timer is involved. Any run of consecutive condensable events with no chat message between them is rendered as a single line. As soon as a regular message appears, the group seals and the next event starts a new group. Switching to a different channel and back always shows the correctly grouped history.
Net-change filter
If the same nick joins and parts within the same group (e.g., a brief reconnect), both events cancel out and neither is shown in the compact view. The expanded view shows every individual event, including the ones that cancel out, so you can see the full sequence of what actually happened.
Overflow
Up to 10 nicks are shown on one condensed line. If more events arrived before a chat message broke the group, the line ends with … X more. Expanding the group always shows all events regardless of the 10-nick limit.
Self-join / self-part
Your own "You joined #channel" and part messages always appear as full lines; they are never condensed, since they mark a meaningful context boundary for you.
Chat area
The large center panel is the chat area. Messages appear in reverse-chronological order (newest at the bottom). History messages replayed by your bouncer or server appear dimmed at the top with their original timestamps.
- Click any URL to open it in your browser.
- When a URL is posted, Uplink fetches a preview card (title + thumbnail) automatically.
- When someone mentions your nick, it is highlighted in red and bold.
- A "nick is typing…" line appears above the input bar when another user is composing a message and their client supports IRCv3
typing(or the earlierdraft/typing). You never see your own typing indicator; it is only shown to others. - Right-click anywhere on a message (body, nick, timestamp, or blank space) for a context menu: Reply, React, and Delete (own messages only, when the server supports it). If you have text selected when you right-click, a Copy option is also included. See Reply, Reactions, and Message deletion.
- Right-click any nick in a message to open the nick context menu: Message, Whois, Copy Nick, and submenus: CTCP ▶ (Ping, Version), DCC ▶ (Send File), Chan Ops ▶ (Op, Voice, Invite, Kick, Ban…). See Nick right-click menu.
- Hover over a nick in a message to see their NickServ account name as a tooltip (when the server reports it via
account-tagoraccount-notify). - Press Ctrl+F to search the current buffer. See Message search.
- When you switch to a channel with unread messages, a ── N new messages ── divider appears at the point where new messages start, and the view scrolls there automatically. See Unread separator & scroll memory.
Quick channel switcher (Ctrl+K)
Press Ctrl+K (Cmd+K on macOS) to open a floating search popup listing all joined channels. Start typing to filter by channel name or server name; the list narrows as you type.
- Up/Down: select a channel from the list
- Enter: switch to the selected channel
- Escape: dismiss without switching
Scrollback history loading
When you scroll to the top of a channel buffer, Uplink automatically loads older messages and prepends them above the existing buffer without jumping the scroll position. There are two sources, and it picks whichever is available:
| Source | When it's used |
|---|---|
The server — CHATHISTORY BEFORE |
On networks that support the chathistory or draft/chathistory capability (Ergo, soju, modern ZNC). Continues until the server returns an empty batch. |
| Your local logs | Everywhere else — plain networks like Libera with no bouncer. Requires Log Messages to Disk (Preferences → Logging); history accumulates from the moment you turn it on. Only used when the server offers no history capability, so the two never double up. |
Log-backed history also seeds a buffer when you open it: joining a channel, opening a PM or opening the server window loads the last 100 logged lines straight away, so a buffer is never blank on a network without server history. This is skipped when the server is replaying its own history, and happens once per buffer per run.
If neither source is available — no server history and logging switched off — a status line at the top of the buffer points you at the logging setting rather than leaving you at a silent dead end.
One caveat worth knowing: messages deleted with draft/message-redaction reappear when history is paged back from local logs. Redaction removes a message from the server and from your view, but does not rewrite log files already on your disk.
Jump to bottom
On busy channels, scrolling up locks the viewport so incoming messages don't snap you back to the bottom. A floating ⬇⬇ button appears in the bottom-right corner of the chat area; click it to return to live chat. The button fades in when you scroll up and fades out when you return to the bottom.
Unread separator & scroll position memory
New messages separator
When you switch to a channel that has unread messages, Uplink inserts a horizontal divider in the chat view right before the first message you haven't seen yet:
21:14  alice: hey, anyone around?
21:15  bob:   yeah what's up
── 3 new messages ──
21:22  carol: just got here
21:22  dave:  same
21:23  alice: cool, let's talk

The view scrolls automatically to show the separator at the top of the viewport, so you immediately see exactly where you left off, no hunting for your place in a busy channel. The separator clears as soon as you open the channel (unread count resets).
Scroll position memory
If you were reading back through history (scrolled up, not at the bottom) when you switched away from a channel, Uplink remembers exactly where you were. When you switch back, the scroll position is restored to the same spot.
If you were at the bottom when you switched away, the channel opens at the latest message as normal; no saved position is applied.
Typing indicator
When someone in a channel starts typing a reply, a small line appears above the input bar:
alice is typing…

When they stop typing (or send their message), the line disappears automatically.
Requirements
Both sides need to support IRCv3 typing (finalized) or draft/typing (earlier variant; Ergo, soju, and most modern clients support one or both). Uplink negotiates both caps automatically and handles either form, no configuration needed. If the server advertises neither cap, the feature is silently inactive.
What you see vs. what others see
You never see your own typing indicator. The indicator is only shown to other users in the channel: you see theirs, they see yours. This is by design: seeing your own "is typing…" would be distracting and confusing.
| Scenario | What happens |
|---|---|
You start typing in #linux | Other users in #linux see "yournick is typing…"; you do not |
Alice starts typing in #linux | You see "alice is typing…" above your input bar |
| Alice stops typing without sending | The indicator disappears after a few seconds |
| Alice sends her message | The indicator disappears as soon as the message arrives |
| Multiple people typing at once | Each indicator appears as a separate line above the input bar |
Enabling / disabling
The typing indicator can be toggled from Preferences → Interface → Typing Indicator, or in config:
[ui]
typing_indicator = true   # set to false to disable completely
TAGMSG with the +typing=active tag to the channel as you type. If you prefer not to broadcast this, disable the feature in Preferences.
TAGMSG when the server has negotiated the draft/typing capability. On older networks (Undernet, EFnet, IRCnet) that do not support this extension, the typing indicator is automatically silenced. No errors, no spam.
Nick list panel
The user list sits in a panel on the right side of the chat. The header shows the network name (* Network), a groups icon, the user count, and a close button (▦).
- Click the ▦ close button in the nick panel header to collapse the panel. A reveal button appears in the channel header row, right of the search button; click it to expand the panel again.
- Drag the divider between the chat and the nick panel to resize it; width is saved.
- Nicks are sorted by prefix rank:
~owner,&admin,@op,%halfop,+voice, then alphabetical. - Nicks with
+B(bot mode) show a small robot icon drawn inline to the right of their name. The icon is colorized to your active theme's accent color and does not depend on any emoji font. - Hover over any nick to see their NickServ account name as a tooltip (shown as
account: namewhen the server has reported it). - Selected and hovered nicks are highlighted with a pill-shaped background in your theme's accent colour, the same style used in the server/channel sidebar.
- Right-click any nick for a full action menu; see Nick right-click menu below.
- A filter box sits between the header and the list. Type to narrow the list by name; see Nick list filter below.
Nick list filter
A small filter box sits directly above the nick list, below the panel header. Type any letters to instantly narrow the nick list to only the nicks that start with those characters.

How it works
The filter is always visible and always active. As you type, any nick that doesn't begin with your input disappears immediately; only matching nicks remain.
Filter: si

  Before              After
  ──────────          ──────────
  @alice              sienna
  @bob                silver
  sienna              sion
  silver
  sion
  zorba
The match is case-insensitive: typing Al matches alice, Albert, and ALAN equally.
Clearing the filter
- Click the ✕ button on the right of the filter box to clear it; the full nick list is instantly restored.
- Press Escape while the filter box has focus to clear the text.
- The filter clears automatically when you switch to a different channel.
Example use cases
- Busy channels: in a channel with hundreds of nicks, type the first two letters of someone's nick to find them instantly without scrolling.
- Checking who's around: type a common prefix to see all nicks from a particular group at a glance.
- Before tab-completing: if you can't remember exactly how to spell someone's nick, filter the list first to narrow your options, then type in the input box and Tab-complete.
Nick right-click menu
Right-clicking any nick, whether in the user list on the right or directly in the chat view, opens the same context menu. The menu title shows the nick in bold.
| Action | What it does |
|---|---|
| Message | Opens a private message buffer for that nick in the sidebar. Equivalent to /msg nick. |
| Send File | Opens a file picker and sends the file via active DCC: Uplink opens a port and the recipient connects in. Works when you have a reachable IP. |
| Send File (Passive) | Sends via passive DCC: the recipient opens the port and Uplink connects out to them. Use this when you are behind a home router or VPN. |
| Whois | Sends a WHOIS request. The full response (hostname, channels, idle time, account, TLS status) appears in the active channel, right where you are chatting. See Looking up users. |
| Invite | Opens a dialog pre-filled with the current channel. Edit if needed and click OK to send INVITE nick #channel. |
| Give Op | Sets +o on the nick in the current channel. Requires op. |
| Take Op | Removes -o from the nick in the current channel. Requires op. |
| Give Voice | Sets +v on the nick in the current channel. Requires op or half-op. |
| Take Voice | Removes -v from the nick in the current channel. Requires op or half-op. |
| Version | Sends a CTCP VERSION request. The reply (client name and version) appears in the active channel. See Looking up users. |
| Ping | Sends a CTCP PING with a millisecond timestamp. The round-trip time appears in the active channel as Ping reply from nick: Xms. See Looking up users. |
| Copy Nick | Copies the nickname to the system clipboard; paste it into the input bar or anywhere else. |
| Ignore ▶ | Opens a submenu with three checkboxes: Private Messages, Notices, and Invites. Tick or untick each independently. Channel messages are always visible regardless of what is checked. If any type is active, an Unignore All option appears at the bottom of the submenu to clear everything at once. Changes take effect immediately and persist in config. |
| Kick | Prompts for an optional reason, then sends KICK #channel nick :reason. Requires op. |
| Ban | Sets MODE #channel +b nick!*@*; bans the nick by name. Requires op. |
| Kick & Ban | Bans first, then kicks. Prompts for an optional reason. Requires op. Both actions are sent in the correct order. |
The same menu appears whether you right-click in the nick list panel on the right or on a nick link in the chat view (nicks in messages are clickable anchors).
Account tracking
Uplink tracks each user's NickServ account name in real time. This lets you see who is actually behind a nickname, even if someone changes their nick, as long as they're authenticated with services.
Where to see it
Hover over any nick to see their full profile. Both locations show identical information:
- Chat view: hover over any coloured nick link in a message. Works in the primary chat view and all split panes.
- Nick list panel: hover over any nick in the right-side user list.
The tooltip shows whatever the server has reported for that user:
- Display name: their friendly name set via
draft/metadata(e.g. Alice Smith). - Account: their NickServ account name (e.g.
alice_libera), reported viaaccount-tag,account-notify, orextended-join. - Avatar: a 32×32 thumbnail if they have set an avatar URL via
draft/metadataand Uplink has fetched it.
If the tooltip is absent, the server has not reported any of those values for that nick: either they are not authenticated or the server does not support the relevant capabilities.
How it stays current
Uplink pulls account data from four sources so the information is always up to date without any manual queries:
| Source | When it fires | What it provides |
|---|---|---|
account-tag |
On every message the user sends | Account name attached directly to the message; no separate event needed. Updates on every single message in real time. |
account-notify |
When a nick logs in or out of services | An ACCOUNT command is sent to all clients in shared channels the moment authentication status changes. |
extended-join |
When a user joins a channel | The account name is included directly in the JOIN message; no extra query needed on join. |
| WHOX scan | After you join a channel | Uplink sends WHO #channel %cnfa,42 to bulk-populate all accounts for everyone already in the channel. On servers that do not advertise WHOX in ISUPPORT, a plain WHO is sent instead. |
All four are negotiated and handled automatically; no configuration needed.
account: alice_libera, because it's tied to the account, not the display name.
User metadata: display names & avatars
On servers that support the IRCv3 draft/metadata capability (Uplink speaks both the -2 and -3 revisions), every user can publish a display name and an avatar image that other clients automatically receive and display. Think of it as a lightweight profile attached to your IRC nick, stored on the server and synced in real time. Channels get the same treatment: an op can set a channel avatar with /chanavatar <url>, and it appears as the channel's icon in everyone's sidebar.
draft/metadata is an in-development IRCv3 extension; Uplink negotiates draft/metadata-3 when offered and falls back to draft/metadata-2. Ergo supports it. Most traditional networks (Libera, OFTC) do not. Uplink silently skips metadata if the server does not advertise the capability: no errors, it just does nothing.
/caps in a server buffer to see which capabilities survived your bouncer.
Where it displays
Hover over any nick, in the right-side nick list panel or directly over a coloured nick link in any message. A tooltip appears showing that user's profile:
[avatar image]  Alice Smith
                alice
Both locations show identical information. Uplink fetches the avatar image in the background as soon as the metadata arrives and caches it for the session; subsequent hovers are instant. Avatars are displayed at 32×32 with no upscaling, so small icons like favicons stay crisp.
Metadata follows a nick across all channels on the same server. If Alice sets her display name, you will see it in #general, #linux, and every other channel you share with her.
Channel avatars
Channels can have an avatar too. A channel operator sets one with /chanavatar <https-url> in the channel's buffer (leave the URL off to clear it), and every Uplink in the channel shows the image as that channel's icon in the sidebar, updating live when it changes.
Things to know:
- Image files must be 1 MB or smaller (and at most 4096px). Larger files are rejected and Uplink tells you so in the channel buffer. At sidebar size, a small image of a few tens of KB is plenty.
- The URL must be a public
https://link. Private/LAN addresses and redirects are refused, and local file paths are not accepted from the network. - Setting requires channel operator status; anyone else gets a
[FAIL] METADATA KEY_NO_PERMISSIONline from the server. Being a network oper is not enough. - On Ergo, the avatar persists only if the channel is registered with ChanServ. An unregistered channel loses all of its state, avatar included, when its last member leaves.
Setting your own display name and avatar
There are two ways to set your profile: via the Preferences dialog or via slash commands. Both save the values to your config so they are re-published automatically every time you connect to a supporting server.
Via Preferences
- Open Settings → Preferences from the menu bar and select the Profile page.
- Enter your Display Name, the friendly name other users see in the tooltip (e.g. Alice Smith). It does not replace your IRC nick.
-
Enter your Avatar URL, a full
https://link to an image file. Or click Browse... to pick a local image from your computer. Optionally add a Status line ("afk until monday") — it shows in italics in your nick tooltip, and/status <text>sets it from any buffer.- Web URL (e.g.
https://example.com/avatar.png): broadcast to the server; other users see it when they hover your nick. - Local file path (e.g.
/home/alice/avatar.png): displayed only in your own client; never sent to the server, so other users will not see it.
- Web URL (e.g.
- Click Apply to connected servers. Uplink saves the values, sends them to every currently-connected server that supports metadata, and updates your own nick tooltip immediately; no reconnect needed.
From then on, Uplink automatically publishes your profile each time you connect; no need to re-enter anything.
Via commands
You can set your display name and avatar directly from the input box:
/displayname Alice Smith
/avatar https://example.com/avatar.png
/avatar /home/alice/avatar.png
To clear a value (remove it from the server), run the command with no argument:
/displayname
/avatar
Both commands print a confirmation in the current buffer. If the server does not support metadata, the command tells you instead of silently failing.
| Command | Effect |
|---|---|
/displayname Alice Smith | Set display name to "Alice Smith" |
/displayname | Clear your display name |
/avatar https://…/pic.png | Set avatar to a web URL (visible to others) |
/avatar /home/alice/avatar.png | Set avatar to a local file (visible only to you) |
/avatar | Clear your avatar |
Config file
You can also set your profile directly in ~/.config/uplink/config.toml:
[profile]
display_name = "Alice Smith"
avatar_url = "https://example.com/avatar.png"
Values are loaded on startup and published on each connect to a supporting server.
How it works under the hood
When Uplink connects to a server that advertises draft/metadata-2 or -3, the capability is negotiated during the normal CAP handshake. The server then pushes a change notification whenever a user's display-name or avatar key changes; no polling needed.
Setting your profile sends a METADATA * SET command to the server:
METADATA * SET display-name :Alice Smith
METADATA * SET avatar :https://example.com/avatar.png
The server stores those values and immediately broadcasts them to other connected clients. When Uplink receives an avatar URL for a nick, it fires a background HTTP request to fetch the image, caches it in memory, and updates the tooltip. The first hover before the fetch completes shows the name and account only; subsequent hovers show the image.
Local file paths (starting with / or file://) are loaded from disk directly, with no network request. They are never sent to the server, so other users see no avatar for you unless you also have a web URL configured.
Turning it off
Avatars and metadata are on by default. There are two switches, at different levels:
| Switch | What it does |
|---|---|
Preferences → Chat Window → Show Avatarsshow_avatars under [ui] |
Keeps metadata running but never fetches avatar images. Display names and status text still work. Applies immediately: cached images are dropped and sidebar icons clear. |
File → Manage Servers → Use metadatametadata in a [[server]] block |
Uplink never requests the capability on that server. Nothing about you is published, and no display names, avatars or status text come back. Applies on the next connection to that server. |
The avatar switch exists because an avatar URL is picked by another user or a channel op, and fetching the image tells whatever host it points at your IP address. Everything else metadata carries arrives in-band over IRC and reaches no third party.
Signal bars (lag / latency indicator)
Four stair-step bars sit at the left end of the channel header, just before the topic toggle. They show your connection quality to whichever server is currently active. Switch to a channel on a different server and the bars update immediately to reflect that connection.
Hover over the bars to see your exact latency in milliseconds (e.g. 42 ms), or the current connection state if not connected.

| Appearance | Meaning |
|---|---|
| 4 solid green bars | Connected, latency < 50 ms (excellent) |
| 3 solid green bars | Connected, latency 50–149 ms (good) |
| 2 solid green bars | Connected, latency 150–299 ms (fair) |
| 1 solid green bar | Connected, latency ≥ 300 ms (high lag) |
| Blue flashing | Connecting or reconnecting |
| Red flashing | Disconnected |
Uplink sends a PING every 30 seconds and measures the round-trip time (RTT). The bar count updates automatically after each ping reply.
System tray
Closing the window minimizes Uplink to the system tray; it keeps running in the background.

- Left-click the tray icon to show or hide the window.
- Right-click for a menu with Show and Quit.
- A green dot on the tray icon means you have an unread mention or PM and the window is not focused. It clears when you focus the window.
- A red dot means there are unread messages in any channel.
To control the notification dot, go to Preferences → Notifications → Tray Notifications, or set in config:
notifications = true # green dot on tray for mentions/PMs
Sending messages
Click on a channel in the sidebar to make it active. Type your message in the input box at the bottom and press Enter to send.
To perform an action (like * alice waves), use /me:
/me waves at everyone
The byte counter
IRC limits each message to roughly 500 bytes on the wire. When a message passes half that budget, a small counter fades in at the right edge of the input box, e.g. 412/493 (bytes used / bytes available; the exact budget depends on the channel name and any pending reply). Cross the limit and the counter turns amber and switches to a message count, e.g. 2 messages: nothing is ever cut off; Uplink splits long text into multiple messages (always at character-safe boundaries) and the counter tells you how many will be sent.
Bold/color formatting and emoji count against the budget (they cost bytes on the wire even when they look like one character), so the counter can move faster than your character count. Under half budget the counter stays hidden; normal chat never sees it.
Slash commands
Type a / to start a command. Tab-completion works on command names too: type /p and press Tab to cycle through /part, /ping, etc.

/ offers command autocomplete; Tab cycles through the matches.| Command | What it does | Example |
|---|---|---|
/join #channel | Join a channel | /join #linux |
/part [reason] | Leave the current channel | /part goodbye |
/leave | Leave the channel, or close a PM/query window | /leave |
/close | Same as /leave: closes a PM window or parts a channel | /close |
/nick newnick | Change your nickname | /nick alice_ |
/me action | CTCP action | /me waves |
/msg nick text | Send a private message | /msg bob hey there |
/query nick [text] | Open a PM buffer, sending the text if given | /query bob got a sec? |
/topic text | Set the channel topic (requires op) | /topic Welcome! |
/kick nick reason | Kick a user (requires op) | /kick bob bye |
/op nick | Give someone channel op | /op bob |
/voice nick | Give someone voice | /voice carol |
/ban mask | Ban a hostmask | /ban *!*@badhost.net |
/ping nick | Measure round-trip time to a nick; reply appears in the active channel | /ping bob |
/whois nick | Full user info (hostname, channels, idle time, account); reply appears in the active channel | /whois bob |
/whowas nick | History for a departed nick (last known user@host and realname); reply appears in the active channel | /whowas bob |
/setname realname | Change your realname (GECOS) on the fly without reconnecting (IRCv3 setname) | /setname Alice Smith |
/persistence [on|off|default] | Stay on the server while your client is disconnected, where the server supports it (Ergo always-on). No argument reports the current state | /persistence on |
/list | Open the channel browser: a sortable dialog of every channel with user counts and topics; type in the dialog to filter | /list |
/stats query | Request server statistics; results appear in the active channel | /stats u |
/time | Query the server's local time | /time |
/version nick | Ask what IRC client a nick is running; reply appears in the active channel | /version bob |
/monitor add <nick> | Watch for a nick coming online | /monitor add alice |
/monitor del <nick> | Stop watching a nick | /monitor del alice |
/monitor list | Show your current watch list | |
/monitor clear | Clear all watched nicks | |
/monitor status | Request current online/offline status | |
/ignore nick [pm] [notice] [invite] | Suppress private messages, notices, and/or invites from a nick; channel messages always visible. Omit flags to suppress all three. | /ignore spammer / /ignore recruiter invite |
/unignore nick | Remove a nick from the ignore list entirely | /unignore spammer |
/ignored | List ignored nicks and their active flags | |
/ns text | Shortcut for PRIVMSG NickServ | /ns identify pass |
/cs text | Shortcut for PRIVMSG ChanServ | /cs op #uplinkirc |
/away message | Set yourself away | /away at lunch |
/back | Clear your away status | /back |
/clear | Clear the chat buffer | /clear |
/raw line | Send a raw IRC protocol line to the server | /raw MODE #uplinkirc +m |
/quote line | Alias for /raw | /quote INVITE alice #uplinkirc |
/ANYTHING | Any unrecognized command is sent as-is, no prefix needed | /REHASH, /SAMODE #uplinkirc +o alice |
/quit [message] | Disconnect | /quit see ya |
/sysinfo | Collect OS/CPU/RAM/GPU/uptime info and post to channel; collection runs async with 12s timeout | /sysinfo |
/help | List all commands | /help |
/raw for server-specific commands.
Commands that are not in the list above are not forwarded to the server; typing /REHASH prints Unknown command and sends nothing, which protects you from typos silently going to the server.
To send oper or server-specific commands like REHASH, SAMODE, or GLOBOPS, prefix them with /raw (or its alias /quote): /raw SAMODE #chan +o alice.
/oper itself is built in and works directly.
/whois alice while in #linux, the full WHOIS response lands in #linux.
Run it from alice's PM window and it lands there instead. See Looking up users for full examples.
Looking up users: /whois, /version, /ping
Three commands let you inspect another user in detail. All three post their results in the active channel or PM window, wherever you have focus when the reply arrives. You do not need to switch to the server buffer to see them.
/whois: full user profile
Returns everything the server knows about a nick: hostname, real name, which channels they are in, which server they are connected to, idle time, NickServ account, and whether they are on a secure (TLS) connection.
/whois alice
Example: running /whois alice while in #linux. The entire block appears in #linux:
alice is alice@host.example (Alice Smith)
alice is in channels: #linux #uplinkirc #general
alice is on irc.libera.chat (Libera.Chat)
alice is identified as account: alice
alice has been idle 2 minutes, signed on 14:30:01
alice is using a secure TLS connection

You can also trigger it from the user list or chat view: right-click any nick → Whois. No need to type the command if you can see the nick.
/whois yournick yournick (nick twice) forces the server to return your own idle time and away status, useful for debugging whether your away message is set.
/version nick: what client are they running?
Sends a CTCP VERSION request to the nick. Their client automatically replies with its name and version string. The reply appears in your active channel.
/version alice
Example output in the active channel:
VERSION reply from alice: Uplink 0.25.0 / Qt 6.7.2 / Linux x86_64
Common replies from other clients:
VERSION reply from bob:   HexChat 2.16.2 Linux [x86_64]
VERSION reply from carol: Irssi v1.4.5 - https://irssi.org
VERSION reply from dave:  WeeChat 4.3.1 (compiled Apr 2 2024)
VERSION reply from bot:   (no reply, most bots block CTCP)
/ping nick: measure round-trip latency
Sends a CTCP PING with a high-resolution timestamp. When the reply arrives, Uplink calculates the round-trip time and posts it to the active channel.
/ping alice
Example output:
Ping reply from alice: 23ms
What the numbers mean:
| Result | What it indicates |
|---|---|
| 1–50 ms | Same region or same server, very low latency |
| 50–150 ms | Different country or continent, normal for international chat |
| 150–400 ms | High latency, possibly a satellite connection or slow network path |
| No reply | The nick has CTCP PING blocked, or their client does not support it |
# You are in #linux, talking to alice and bob:
/whois alice     →  full WHOIS block appears in #linux
/ping alice      →  "Ping reply from alice: 23ms" in #linux
/version alice   →  "VERSION reply from alice: Uplink 0.25.0" in #linux
/whois bob       →  full WHOIS block appears in #linux (below alice's)
Using right-click instead of commands
All three are also in the nick right-click menu: right-click any nick in the user list or directly in the chat view, then choose:
- Whois: same as
/whois nick - Version: same as
/version nick - Ping: same as
/ping nick
The reply appears in the active channel regardless of whether you used the command or the menu.
Listing channels: /list
To browse all channels on the current server, type:
/list
A Channel Browser dialog opens. Results stream in as the server sends them, so you don't have to wait for the full list before you can start filtering.

Sorting and filtering
- Click any column header (Channel, Users, Topic) to sort by that column. Click again to reverse. User count sorts numerically by default (highest first).
- Type in the filter box at the top to narrow results; it matches against channel name and topic simultaneously.
Joining a channel
- Double-click any row, or select a row and click Join, to join that channel.
- The dialog stays open after you join so you can browse and join more channels.
Refreshing
Click Refresh to re-request the channel list from the server. Useful if the server's list has changed since you opened the dialog.
Server queries: /stats, /time, /whowas
/stats: server statistics
The /stats command asks the server for operational information. The result appears in the active channel buffer.
| Command | What it returns |
|---|---|
/stats u | Server uptime |
/stats o | IRC operator list |
/stats m | Command usage counts |
Other letters may be supported depending on your IRC server. On Ergo, /stats u is the most useful.
/time: server local time
Run /time with no arguments to query the server's local time:
/time
The result appears in the active channel buffer. To query another user's local time via CTCP, use /time nick instead.
/whowas: history for departed nicks
If a nick has left the network, /whowas shows their last known connection details:
/whowas alice
The reply shows the user's last user@host and realname, and appears in the active channel buffer alongside WHOIS output.
Changing your realname: /setname
Your realname (also called GECOS) is the longer description shown in WHOIS output. Normally it is set in your config and only applied when you connect. With the IRCv3 setname extension, you can change it on the fly without reconnecting:
/setname Alice Smith
The change takes effect immediately on servers that support setname (Ergo does). Other users in channels you share will see a status line: alice changed their realname to "Alice Smith".
/setname only lasts for the current connection. To make it permanent, update the realname field in your config file and save.
Private messages
Use /msg nick message to send a PM. A new buffer for that person appears in the sidebar. Incoming PMs also open their own buffer automatically.
You can also right-click a nick in the user list or directly in the chat view and choose Message to open the buffer without typing a command.
/msg bob hey, are you around?

Messaging IRC services (NickServ, ChanServ…)
Services like NickServ and ChanServ are bots that live on the server and respond via private message. Uplink has shortcut commands for the most common ones:
| Command | Sends to | Example |
|---|---|---|
/ns <text> | NickServ | /ns help |
/cs <text> | ChanServ | /cs help |
/bs <text> | BotServ | /bs botlist |
/ms <text> | MemoServ | /ms list |
Or use the full form: /msg NickServ help, /msg ChanServ op #uplinkirc, etc.
Where do the replies appear? When you send a message to a service, Uplink opens a PM tab for that service in the sidebar (e.g. a NickServ tab or ChanServ tab). Replies from that service, including help output, error messages, and confirmations, arrive in that same tab. If you have not messaged the service yet, their replies go to the server buffer instead.
/ns identify mypassword or /msg NickServ identify mypassword, Uplink shows IDENTIFY <redacted> in the NickServ tab; your actual password is never displayed in the chat view. The command still goes to the server correctly. This redaction covers IDENTIFY, REGISTER, GHOST, RECOVER, and other password-taking commands.
/msg ChanServ help opens a ChanServ tab and sends the request. ChanServ's help reply arrives in that same ChanServ tab, not in the server buffer or the channel you were looking at.
IRC text formatting: send & receive
Uplink both renders incoming mIRC formatting codes and lets you apply them in your own messages using keyboard shortcuts in the input box.
Keyboard shortcuts: applying formatting
Formatting is applied visually as you type: bold text looks bold, italic looks italic, right in the input box. The IRC control codes are generated automatically when you send the message. A small B I U S indicator appears at the bottom-left of the input box showing which formats are currently active; a colored A joins it when a text or background color is set.
| Shortcut | Format | What others see |
|---|---|---|
| Ctrl+B | Bold | bold text |
| Ctrl+I | Italic | italic text |
| Ctrl+U | Underline | underline text |
| Ctrl+S | Strikethrough | |
| Ctrl+Shift+K | Color | Opens a color menu: pick a text and (optional) background color. See below. |
| Ctrl+O | Reset all | Clears all active formatting at once. Back to plain text. |
Shortcuts stack: press Ctrl+B then Ctrl+U to type bold+underlined text. Press the same shortcut again to turn that format off while keeping others active.
Example: bold part of a message
To send: This is very important - please read
This is [Ctrl+B]very important[Ctrl+B] - please read
Example: italic inside a sentence
I was [Ctrl+I]absolutely[Ctrl+I] blown away by that
Example: stacking bold and underline
[Ctrl+B][Ctrl+U]really important[Ctrl+O] - back to normal
Use Ctrl+O to reset all formatting at once instead of toggling each one off individually.
Applying color
Color works like the other formats: set it, type, and it is encoded when you send. There are two ways to open the color menu:
- Press Ctrl+Shift+K in the input box.
- Right-click the input box and open the Color submenu on the standard edit menu.
Pick a Text color from the 16 standard mIRC colors and, optionally, a Background. The color applies to whatever you type next (or to a selection), and a colored A appears next to the B I U S indicator while it is active. Choose Reset color to return to the default, or press Ctrl+O to clear color along with every other format.

Received formatting: what Uplink renders
All standard mIRC formatting codes in incoming messages are rendered automatically:
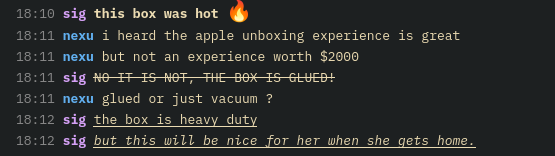
| Code | Effect |
|---|---|
Bold (\x02) | Bold text |
Italic (\x1D) | Italic text |
Underline (\x1F) | Underline text |
Strikethrough (\x1E) | |
Reset (\x0F) | Clears all formatting at that point |
Color (\x03fg,bg) | 16 foreground + background colors (standard mIRC palette) |
Emoji and shortcodes
There are three ways to use emoji in Uplink:
1. Type a shortcode: inline autocomplete
Start typing : followed by the emoji name. A completion list pops up:
:fire    →  shows completion list: 🔥 fire, ...
:thumbs  →  shows: 👍 thumbsup, 👎 thumbsdown, ...

:name and an inline autocomplete list of matching emoji appears.Navigate with ↑ / ↓, select with Enter or Tab, dismiss with Escape.
2. Type a full shortcode: instant substitution
Type the opening colon, the name, and the closing colon. The emoji replaces it instantly:
:trident:   →  🔱  (substituted as you type the closing colon)
:joy:       →  😂
:100:       →  💯
3. Emoji picker button
Enable the button in config or Preferences, then click 😊 to open a searchable grid of 1,900+ emoji (Unicode 16.0, with GitHub-compatible shortcodes). The search box accepts plain words or shortcode style: poop and :poop both work. Press Enter to commit the first match without clicking.
[ui]
show_emoji_button = true
Emoji size
Emoji in chat are rendered at their own independent font size so they stay readable even if you use a small chat font. The default is 16 pt. Change it in Preferences → Font Config… → Chat Emoji, or set it directly in config:
font_emoji = 16 # pt, independent of font_chat
4. Send button
The paper-plane button that floats inside the right edge of the input box sends the current message, identical to pressing Enter. It is enabled when the input is non-empty and disabled when blank.
If you prefer a cleaner input bar without the button, toggle it off:
- GUI: Open Settings → Preferences and uncheck Show Send Button.
- Config:
[ui]
show_send_button = false   # hide the paper-plane button; press Enter to send
The setting persists across restarts. You can turn it back on the same way.
Multi-line messages
The message input box supports multiple lines, useful for pastes, code snippets, or structured replies.
Composing
Press Shift+Enter to insert a line break. The box grows automatically from 1 to 4 lines as you type. Press Enter (without Shift) to send the whole message.

How it reaches the server
When the server supports IRCv3 draft/multiline, Uplink sends the message as a proper multi-line batch: all lines arrive as a single logical message. On servers without the capability, each line is sent as a separate PRIVMSG in sequence; no content is lost, though recipients without multi-line support see individual lines.
Receiving multi-line messages
Incoming draft/multiline batches are assembled and displayed as a single message with line breaks in the chat view.
Tab completion
Press Tab to complete nicknames and slash commands. Completion works in every input bar: the primary channel input and any open channel pane inputs.
- Type the first few letters of a nick and press Tab. If there is one match, it fills in immediately. If there are several, pressing Tab again cycles through them in alphabetical order.
- Works for commands too: type
/joand press Tab to get/join. Cycles through all matching commands on repeated presses. - At the start of a line, the completed nick gets a colon appended:
alice:, the standard IRC convention for addressing someone directly. - Tab completion in a channel pane uses the nick list for that pane's channel, not the primary channel. You always get the right nicks regardless of which input is focused.
- Press Shift+Tab to cycle backwards through completions.
- Pressing any other key after a completion resets the cycle, so you can start a new completion at any point.
al[Tab]           →  alice:           (start of line, colon appended)
thanks al[Tab]    →  thanks alice     (mid-line, no colon)
al[Tab][Tab]      →  alex:            (next match)
al[Shift+Tab]     →  alice:           (cycle back)
/p[Tab]           →  /part
/p[Tab][Tab]      →  /ping
/p[Tab][Tab][Tab] →  /privmsg

Input history
Press ↑ in the input box to scroll back through messages you've sent in this session. Press ↓ to go forward again. The history is per-session and is not saved to disk.
Per-channel drafts
Half-typed messages stay with their channel. If you're writing something in #linux and switch to another channel to check a mention, the unsent text is stashed; when you come back to #linux, it's right where you left it, with the cursor at the end. Every channel and PM buffer keeps its own draft, so switching around never mixes them up or carries text into the wrong channel.
There's nothing to configure; it's just how the input box behaves.
- Drafts are per-session and not saved to disk. Quitting Uplink discards them.
- Sending or clearing the message discards that buffer's draft, as you'd expect.
- Closing a channel or removing a server discards its drafts.
- Switching away while a draft is pending also ends your "is typing…" indicator in that channel; you won't appear to be typing in a channel you've left open in the background.
Message search (Ctrl+F)
Press Ctrl+F anywhere in Uplink to open a search bar below the chat area. Start typing and the first match jumps into view immediately with the text highlighted.

| Key | Action |
|---|---|
| Enter | Jump to the next match (wraps around to the top) |
| Shift+Enter | Jump to the previous match |
| Escape | Close the search bar and clear the highlight |
✕ button | Close the search bar |
Ctrl+F works whether you are focused on the chat view or the message input box.
Full history search (Ctrl+Shift+F)
Ctrl+F only covers the messages currently loaded in the buffer. To search the current channel's entire logged history, press Ctrl+Shift+F. This opens a separate window that scans the channel's on-disk log file and lists matching lines newest-first. Tick Regex to match with a regular expression instead of a plain substring.
Because it reads the log on disk, full history search only covers messages that were actually logged: enable message logging in Preferences to record history. Without it, there is nothing on disk to search beyond the visible buffer.
Double-click a result (or press Enter on it) to jump to that message in the channel: Uplink loads older history from the server if it has to, scrolls to the message, and briefly highlights it. On servers without history support the jump lands at the oldest message it can reach.
Tick All buffers to search every logged channel and PM across all your servers in one pass. Results are grouped per buffer: a bold header shows the channel, server, and match count, followed by that buffer's newest matches. Jumping works the same from here: double-click a result to land on that message in its buffer.

Examples. With Regex ticked:
| Query | Finds |
|---|---|
release | Every line containing "release" (plain substring, Regex off) |
error|timeout|failed | Lines mentioning any of those words |
<alice> | Messages sent by alice (log lines write the nick as <nick>) |
^\[2026-07-04 | Everything logged on 4 July 2026 (lines start with [YYYY-MM-DD…]) |
Reply to a message
Uplink supports IRCv3 draft/reply: replies that reference a specific message by its unique ID. The server must have negotiated message-tags (all modern IRC servers do).
Sending a reply
Viewing replies you receive
When someone replies to a message using a client that supports draft/reply, a small ↩ origNick indicator appears before their nick in the chat, showing whose message they are replying to.
14:30 alice: what's everyone using for backups these days?
14:31 ↩ alice  bob: rsync + rclone to Backblaze, works great
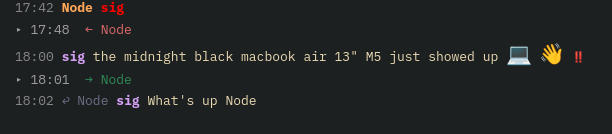
draft/reply simply see your message as normal; the reply tag is invisible to them. No special server setup is needed beyond standard IRCv3 message-tags.
Reactions
Uplink supports IRCv3 draft/react: emoji reactions attached to specific messages. Both sending and receiving are supported.
Sending a reaction
:thumbs or just thumbs), then click the emoji you want.Alternatively, after right-clicking a message and choosing Reply (which sets the message target), you can use:
/react 👍
Viewing reactions
Received reactions appear inline below the original message as emoji(count), for example:
14:22 <alice> anyone tried the new soju release?
👍(2) ❤️(1)

emoji(count).draft/react capability. On servers that do not support it, reactions are not sent and will not be received.
Message deletion
Uplink supports IRCv3 draft/message-redaction: you can delete your own sent messages from the chat history.
The message is replaced with [message deleted] in grey italic. Other clients that support draft/message-redaction will also hide the message.

draft/message-redaction capability during the CAP handshake. You can only delete your own messages.
For Ergo server operators, three things must be configured in
ircd.yaml:
- A persistent history database (SQLite, MySQL, or PostgreSQL) under
datastore:. The default Ergo package binary may not include SQLite support; if so, rebuild from source withmake build_full. - Persistent history enabled under
history.persistent.enabled: true. allow-individual-delete: trueunderhistory.retention:, not directly underhistory:.
draft/message-redaction will then appear in the server's CAP LS and the Delete option will be available.
Ignore list
The ignore list suppresses specific types of private communication from a nick, client-side. The ignored user does not know they are being ignored. Channel messages are never blocked; you can ignore someone's PMs and invites while still seeing them talk in a channel.
Ignoring a nick: right-click menu
Right-click any nick in the user list or chat view and hover over Ignore ▶. A submenu opens with three independent checkboxes:
| Checkbox | What it blocks |
|---|---|
| Private Messages | Private PRIVMSG and /me actions sent directly to you |
| Notices | Private NOTICEs sent directly to you |
| Invites | INVITE requests to channels |
Tick or untick each type independently. Changes take effect immediately. If any type is active, Unignore All appears at the bottom of the submenu to clear everything at once.
Ignoring a nick: slash command
You can also use /ignore with optional type flags for the same control from the keyboard:
/ignore spammer              # suppress PMs, notices, and invites (default: all three)
/ignore recruiter invite     # invites only, still see their messages in chat
/ignore spammer pm notice    # PMs and notices, but allow invites
Unignoring a nick
Open the Ignore ▶ submenu and untick individual types, or choose Unignore All to clear everything. Or type:
/unignore spammer
Listing ignored nicks
/ignored # example output: spammer [pm,notice,invite], recruiter [invite]
Config format
The ignore list is saved in config.toml and restored automatically on the next launch:
[[ignore.entry]]
nick = "spammer"
flags = ["pm", "notice", "invite"]

[[ignore.entry]]
nick = "recruiter"
flags = ["invite"]    # invites only, messages still visible
Monitor: online/offline watching
The IRCv3 MONITOR system lets you watch for specific nicks coming online or going offline. When a watched nick connects or disconnects, a status line appears in the server buffer: Now online: alice / Now offline: alice.
| Command | What it does |
|---|---|
/monitor add <nick> | Start watching this nick |
/monitor del <nick> | Stop watching this nick |
/monitor list | Show your current watch list |
/monitor clear | Remove all watched nicks |
/monitor status | Ask the server for current online/offline status of all watched nicks |
To watch for a friend:
/monitor add alice

The watch list is saved to config.toml under [monitor] nicks = [...] and is re-sent on every reconnect. You can also edit it directly:
[monitor]
nicks = ["alice", "bob"]
Message logging
Uplink writes all messages to plain-text log files on disk, one file per channel and per PM conversation.
Log file location
~/.config/uplink/logs/<server>/<channel>.log
For example: ~/.config/uplink/logs/irc.libera.chat/#uplinkirc.log
Log format
[2026-05-31 15:04:22] <nick> message text
[2026-05-31 15:04:22] * nick action text
[2026-05-31 15:04:22] -- system message (join, part, etc.)
History replay messages (from bouncers or chathistory) are not logged, only live messages.
Turning logging on or off
Open Preferences → Logging and check or uncheck Log Messages to Disk. Or set it in config:
[ui]
log_messages = true    # off by default, opt-in
Logging is off by default. Enable it in Preferences or by setting log_messages = true in config.
Link previews
Link previews are disabled by default. To enable them, open Preferences → Chat Window and check Link Previews, or add the following to config.toml:
[privacy]
link_previews = true
When enabled, any message containing a URL causes Uplink to fetch a preview card and append it below the message:
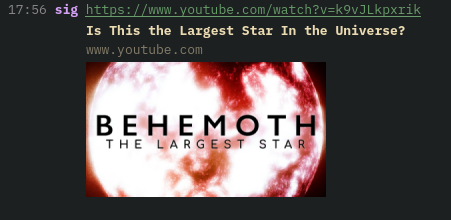
- Web pages: shows the page title (from
og:titleor<title>) and a thumbnail if an Open Graph image is set. - Direct image links:
.png .jpg .jpeg .gif .webpURLs are detected and shown as a thumbnail without any HTML parsing.
Previews are lightweight: HTML is capped at 32 KB, images at 8 MB, results are cached for the session (up to 50 cards; oldest evicted automatically). Private/LAN addresses are never fetched. When multiple URLs arrive at once, preview cards are fetched sequentially (up to 10 queued) so they do not compete with each other.
Interacting with preview cards
- Left-click a preview card → opens the URL in your default browser.
- Right-click a preview card → context menu: Open URL / Hide Preview.
- Right-click the URL text in chat → context menu: Copy URL / Open URL / Hide Preview / Show Preview (if hidden).
- Hover any URL → tooltip shows the domain, then updates to the page title once fetched.
DCC file transfer
DCC (Direct Client-to-Client) lets you send files directly to another user without going through the IRC server. Uplink supports two modes; choose based on your network situation.
Which mode should I use?
| Mode | When to use |
|---|---|
| Send File (active) | You have a reachable IP: direct broadband, a VPS, or port forwarding configured on your router. Uplink opens a port and the recipient connects in. |
| Send File (Passive) | You are behind a home router or VPN and cannot accept incoming connections. The recipient opens the port; Uplink connects out to them. Use this if active DCC never starts. |
Quick guide: try Send File first. If the progress dialog sits at zero with no activity, cancel and try Send File (Passive) instead.
Sending a file (active)
Sending a file (passive, for use behind NAT)
port=0, a signal that the recipient should open the port.Receiving a file
When someone sends you a file (either mode), an accept/reject dialog appears showing the filename and size. Click Yes, choose where to save it, and a live progress dialog tracks the download. Either side can click Cancel to abort at any time.
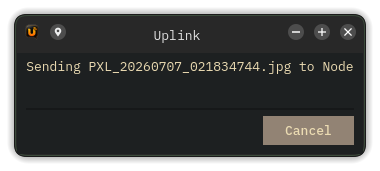
The file is saved to a .part file during the transfer and renamed to the final filename only when the download completes successfully. If the transfer fails or is cancelled, the partial file is deleted automatically. Stalled transfers, where the other side stops responding for over a minute, are aborted with an error rather than left hanging.
Receive limits are enforced before any data is written:
- Maximum file size: 2 GiB. Offers larger than this are rejected before the dialog appears.
- Disk space check. Available space on the destination drive must exceed the advertised file size, or the transfer is rejected with an error.
Timeouts
- Active sender: 60 seconds to receive an incoming connection before the offer is cancelled.
- Active receiver: 30 seconds to connect to the sender before giving up.
- Passive receiver (listening for sender): 60 seconds to receive an incoming connection.
User scripts
Uplink lets you link external scripts to custom slash commands. Scripts can be written in any language: bash, python, ruby, whatever. Four scripts ship bundled and are auto-installed on first launch:
| Command | What it does | Dependencies |
|---|---|---|
/music |
Show the currently playing track from any media player | macOS: brew install nowplaying-cliLinux: playerctl recommended, falls back to MPRIS2/D-BusWindows: Git Bash + PowerShell (built-in) |
/weather [city] |
Current weather; leave blank for IP-detected location, or pass a city name | curl (pre-installed on most systems) |
/uptime |
Show system uptime | None, uses built-in OS commands |
/roll [NdS] |
Tabletop dice roller: /roll 2d6, /roll 1d20, or just /roll for a d6 |
None, pure bash |
Adding your own scripts
greet) and browse to your script.chmod +x yourscript.sh). On Windows, .sh scripts are launched automatically via Git Bash.When you type /greet in chat, Uplink runs your script and sends its stdout to the current channel (max 5 lines). Scripts receive context via environment variables:
| Variable | Value |
|---|---|
UPLINK_NICK | Your current nickname |
UPLINK_SERVER | Server name (e.g. LiberaChat) |
UPLINK_CHANNEL | Current channel (e.g. #uplinkirc) |
UPLINK_ARGS | Everything typed after the command |
Arguments are also passed as positional parameters ($1, $2, etc.). Scripts have a 10-second timeout and cannot shadow built-in commands.
Picking a theme
Uplink ships with 297 built-in color themes. The fastest way is to try them live:
config.toml. Click the theme button again to collapse the list.Follow the system light/dark mode
Uplink can switch themes automatically when your desktop flips between light and dark mode. On the Appearance page, tick Follow System Light/Dark (Auto) and pick a theme for each side in the Light theme and Dark theme dropdowns. From then on, when the OS changes its color scheme (a sunset schedule, KDE Quick Settings, GNOME dark mode), Uplink recolors itself live with no restart.
theme_auto, theme_light, and theme_dark.
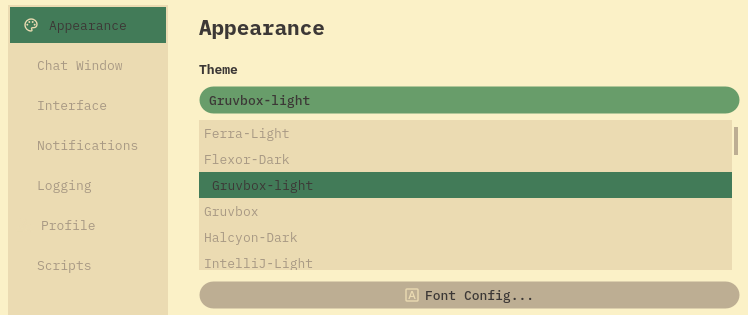
Or set it directly in the config:
[ui]
theme = "catppuccin-mocha"
Popular choices:
| Name | Style |
|---|---|
catppuccin-mocha | Dark, muted purple, the fan favourite |
catppuccin-latte | Light, warm pastels |
nord | Cool blue Arctic palette |
dracula | Dark purple and pink |
gruvbox-dark | Warm retro dark theme |
tokyo-night | Dark Tokyo Night |
solarized-dark | Classic Solarized dark |
one-dark | Atom One Dark |
default | Native OS look (best on Windows) |
.toml file into ~/.config/uplink/themes/ and it appears in the list on next launch. The format matches the shipped themes in the themes/ folder.
Each section of a theme colors its own region of the window: [sidebar] background fills the server/channel list, [nicklist] background the user list, [buffer] background the chat area, and [general] background the window backdrop that shows around the rounded panel cards. Both side panels float as fully rounded cards with an even backdrop gap on all sides; themes that define distinct backgrounds per section get a layered, multi-tone look, while themes that reuse one color stay flat.
Prefer the old uniform look? Untick Preferences → Interface → Panel Cards (config key panel_cards) and every theme renders flat on the buffer color, exactly as before: no rounded corners, no per-panel tones.
The status lines in chat (joins, leaves, nick and topic changes, notices) are colored from the theme's own palette by default, so they match whatever theme is active: leaves and errors take the theme's mention/red, joins its self-nick/green, nick and topic changes its accent/blue, notices and wallops its keyword/amber. To override any of them, add an optional [events] section. It takes seven keys: join, leave (part/quit/kick), nick (nick and topic changes), notice, error, reply, and wallops, each optional, falling back to the palette default when omitted.
[events]
join    = "#2e8b57"
leave   = "#e06b6b"
nick    = "#4682b4"
notice  = "#cc8800"
error   = "#ff0000"
reply   = "#6090c0"
wallops = "#e09030"
Font sizes
Every part of the UI has its own independent font size. Open Preferences → Appearance → Font Config... and drag the sliders, or set them in config:

[ui]
font_family = "IBM Plex Mono"   # any installed monospace font

# Each zone is independently sized (all in points)
font_chat = 11   # message area
font_sidebar = 10   # server/channel list
font_nick_list= 10   # user list on the right
font_input = 11   # message input box
font_topic_bar= 10   # topic bar at the top
font_typing = 9    # "nick is typing..." indicator
Changes from the Font Config dialog are applied and saved immediately; no restart needed. Font sizes support half-point values (e.g. 10.5) for fine-grained control.
Quick zoom with Ctrl+scroll
Hold Ctrl and scroll the mouse wheel over any UI region to zoom its font up or down by 0.5 pt per tick. You can also use Ctrl+Plus and Ctrl+Minus. Each region zooms independently:
- Chat area: message text
- Nick list: user names
- Sidebar: server names and channel names zoom independently (hover over one or the other)
- Input box: your typing area
- Channel header: the #channel (+modes) and "Topic set by" bar
- Topic text: the topic display below the header
- Nick panel header: the user count area
Changes are saved to config.toml immediately and persist across restarts.
Nick brackets
The characters that wrap nicks in chat messages are configurable. Set nick_brackets in [ui]:
| Value | How nicks look |
|---|---|
"<>" | <alice> hello (default) |
"[]" | [alice] hello |
"()" | (alice) hello |
"{}" | {alice} hello |
"::::" | ::alice:: hello |
"" | alice hello (no brackets) |
[ui]
nick_brackets = "[]"   # square brackets
You can also change this live from Preferences → Chat Window → Nick Brackets.
Show and hide panels
Sidebar (server/channel list)
Click the close button in the top-left corner of the sidebar panel. The sidebar collapses and the chat area expands to fill the window. A reveal button appears at the bottom-left of the chat area; click it to restore the sidebar.
Drag the divider between the sidebar and the chat to resize it. Width is saved on quit.
Nick list (user list)
Click the ▦ close button in the nick panel header (top-right corner). The panel collapses. A reveal button appears in the channel header row, right of the search button; click it to expand again.
Drag the divider between the chat and the nick panel to resize it. Width is saved on quit.
Topic display
A text bar showing the full channel topic drops below the channel header row. Toggle it three ways:
- Globally: Preferences → Chat Window → Show Topic Bar, or set
show_topic = truein config. Applies to the main channel view. - Per pane: each channel pane has a ▸ topic / ▾ topic oval button in its header. Click to show or hide that pane's topic independently. The topic bar appears automatically when a pane first opens if the channel has a topic set.
- Primary column header: when panes are open, the same oval topic button appears in the primary channel's header. It is independent of the global Preferences toggle.
[ui]
show_topic = true   # global default, applies to primary channel view on launch
Nick label in input box
[ui]
show_nick_prefix = false   # hides "alice ▸" next to the input
Fade scrollbars
Scrollbars on the chat view, nick list, sidebar, and channel panes are hidden at rest. They appear when you:
- Scroll with the mouse wheel or keyboard
- Click or drag the scrollbar track
- Hover over the scrollbar area
After 3.5 seconds of inactivity, the scrollbar fades out over 300 ms. This keeps the interface clean without hiding the scrollbar when you need it.
Touch scrolling
On touchscreen and tablet devices, all scrollable areas support kinetic flick-to-scroll: swipe your finger and the content keeps moving with natural momentum, then gradually slows to a stop.
This applies to:
- The main chat view
- The server/channel sidebar
- The nick list
- All split channel panes
Touch gestures are automatically distinguished from taps and text selection:
- Quick swipe: scrolls with momentum
- Tap: clicks links and nicks as normal
- Long press then drag: selects text
Mouse behavior is completely unchanged; this feature only activates with touch input.
Hanging indent (word wrap alignment)
By default, when a long message wraps to the next line the wrapped text aligns under the message text rather than back at the left edge under the timestamp. This keeps the timestamp and nick visually separate from the message body.
Toggle from Settings → Preferences → Hanging Indent (wrap under message), or in config:
[ui]
hanging_indent = true   # default on
Turn it off if you prefer the classic flush-left wrap style.
App icon variant
Uplink ships with 22 icon variants across flat, colorful, gruvbox, original, and circle-bubble styles. Pick one from the visual grid in Preferences → Appearance; the icon updates the window, system tray, and KDE Plasma taskbar live.
Or set it directly in config:
[ui]
app_icon = "flat-black"
| Value | Style |
|---|---|
"flat-black" | Flat black (default) |
"gruvbox-orange" | Gruvbox warm orange |
"colorful-blueish" | Colorful blue tones |
"colorful-purple" | Colorful purple |
"original-black" | Original style, black |
"circle-bubble-red" | Speech-bubble badge; also -black, -blue, -cyan, -green, -magenta, -purple |
15 variants total: flat-black, black-old-orange, black-orange, original-black, original-flat-shine, colorful-blueish, colorful-greenblue, colorful-hotbluepink, colorful-orange, colorful-purple, gruvbox-blue, gruvbox-colorful, gruvbox-orange, gruvbox-purple, gruvbox-yellow.
"dark" and "light" config values are auto-migrated to "flat-black" on launch.
Tray notifications
When your nick is mentioned or you receive a PM while the window is not focused, a green dot appears on the tray icon. It clears the moment you focus the window.

Toggle from Settings → Preferences → Tray Notifications, or in config:
[ui]
notifications = true
Highlight words
Besides your nick, you can make any word act like a mention. Go to Settings → Preferences → Notifications → Highlight Words and enter a comma-separated list, or set it in config:
[ui]
highlight_words = "myproject, deploy, lunch"
Messages containing one of these words show the word in red bold and count as mentions in the sidebar unread badge. Matching is case-insensitive and whole-word only: deploy matches "time to deploy" but not "deployment". Changes apply immediately.
Troubleshooting: Build errors
CMake can't find Qt6
If Qt is installed but CMake can't find it, pass its location explicitly:
cmake -DCMAKE_PREFIX_PATH=/path/to/Qt6 -B build
On Homebrew macOS:
cmake -DCMAKE_PREFIX_PATH=$(brew --prefix qt) -B build
tomlplusplus not found
Install the package for your platform, or let CMake fetch it automatically (it will on the first run if not found):
# Arch
sudo pacman -S tomlplusplus

# Ubuntu
sudo apt install libtomlplusplus-dev

# Fedora
sudo dnf install tomlplusplus-devel

# FreeBSD
sudo pkg install tomlplusplus

# macOS
brew install tomlplusplus
Linker errors on Linux
Make sure qt6-base, qt6-svg, and the Network module are all installed and that you're linking against Qt6, not Qt5.
Troubleshooting: Config problems
TOML parse error on startup
All string values in TOML must be in double quotes. The # character starts a comment if it appears outside a string.
# Wrong, causes a parse error
name = LiberaChat

# Correct
name = "LiberaChat"
Using single brackets for servers
# Wrong, defines a single table, not an array
[server]
name = "LiberaChat"

# Correct, double brackets = array entry
[[server]]
name = "LiberaChat"
My config change isn't taking effect
Click File → Reload Config. Uplink restarts and applies all changes, including server list, channels, theme, and font settings.
Troubleshooting: Nick in use
If your nick is taken, Uplink appends _ and tries again (e.g. alice_). The new nick is shown next to the input box. Once the original becomes available, type:
/nick alice
If you have NickServ authentication set up, services may ghost the old connection:
/msg NickServ GHOST alice yourpassword
Troubleshooting: Theme not loading
Uplink stores themes in ~/.config/uplink/themes/ and seeds that folder with all bundled themes on first launch. If themes are missing, delete the folder and restart; it will be recreated and repopulated automatically.
Theme names are case-sensitive and must match the .toml filename exactly (without the extension):
[ui]
theme = "catppuccin-mocha"   # ✓ matches catppuccin-mocha.toml
theme = "Catppuccin-Mocha"   # ✗ won't load, wrong case
To restore a theme you deleted, copy it back from the release tarball's themes/ directory, or from a fresh install.
Troubleshooting: Link previews
Preview didn't appear
- Are link previews enabled? They are off by default. Open Settings → Preferences and check Link Previews, or add
link_previews = trueunder[privacy]inconfig.toml. - The site may block bots; Uplink uses a messaging-app user-agent, but some sites still block.
- The page may have no
og:titleor<title>; nothing to show. - SSL certificate errors block the fetch silently (self-signed or expired certs).
Previews disappeared when I switched channels
Preview cards are stored per-channel and reinjected when you switch back. If a card is missing after switching back, the fetch may still be in progress; wait a moment and it will appear.
Troubleshooting: Window too wide to resize
The window opens wider than my screen and I can't make it smaller
This happens when the saved window geometry is wider than the available screen area, common on FreeBSD or after moving to a smaller display. Uplink v0.25.1 fixes this by clamping the window to the screen after it is shown.
If you are already on v0.25.1 and still see the issue, delete the saved layout file so geometry starts fresh:
# Remove any leftover file from older builds
rm -f ~/.config/LinuxDojo/Uplink.conf

# Remove the current layout file (geometry resets to defaults)
rm -f ~/.config/uplink/uplink.conf
del "%APPDATA%\uplink\uplink\uplink.conf"Relaunch and the window will fit the screen. Your server config and preferences in config.toml are unaffected.
config.toml in ~/.config/uplink/uplink.conf (Linux/FreeBSD/macOS) or %APPDATA%\uplink\uplink\uplink.conf (Windows). Deleting it only resets the window layout.